Thursday, August 28, 2014

Leek and Cheese Quiche

Leek and Cheese Quiche


When I have friends over I usually feel that I am not serving enough food. So when I called over Pritha (who has this lovely blog 'Guilt-Free ' )  for some Brioche au Chocolat  and Cafe Frappe I was at a complete loss as to the savoury items which must be served for a tea party.

It was mostly because I was too lazy to visit New Market (one of the biggest market in Calcutta which stocks up a lot of ingredients) and due to the encephalitis scare we are all avoiding Porky items. That is a big drawback for me because when you have ham and cheese and a bit of bacon anyone can make a fabulous dish but with no porky items I was a bit confused. What added to that confusion was the absence of my internet but I had Camembert at home and having made quiche and tarts before I decided that I would just take a shot and create a recipe .

Once you make tarts and quiche shells you get an idea about the ingredients ratio etc and so its not too problematic to make a tart shell. I knew exactly what I wanted. I wanted a flaky crust with a cheese filling.

So here goes the recipe :-

For the shell

150gm flour
100gm chilled butter
1 egg yolk
Pinch of salt

For the filling :-

125gm Camembert cheese
50gm butter
1 to 1.5 tbsp flour
250ml to 300ml whole milk
Pinch of nutmeg powder
Salt as per taste
Half a finely  chopped leek

Start by cutting the butter in little cubes and using your hands to quickly mix it with the flour. When it feels gritty add the yolk and salt and quickly form a dough and refrigerate for 2 hours. When rolling it out do it over a clean floured work surface and gently place it on the buttered tart pan. Do not worry if it breaks a little just press the broken bits to the tart pan to form a smooth shell, it will come out as a single shell once you bake it.

Preheat oven to 200C and bake the tart shell for 25 minutes to 35 minutes.

Saute the leek in butter and when softened keep it aside. In the meanwhile make your bechamel base by melting the butter and adding the flour and creating a roux by stirring continuously and taking care not to burn it and slowly add the milk bit by bit and the nutmeg and salt while whisking and let it come to a slow boil and simmer for 2 minutes to create a smooth sauce whisking throughout the process.

Once the tart shell is baked let it cool down for 15 minutes and add the bechamel sauce and top with the sauteed leek and sliced cheese and add on top and bake for 15 minutes to 20 minutes.

Note : This is an extremely heavy dish mostly suitable for cold weather

Braised Tofu Mushroom

Braised Tofu Mushroom 


Turns out this is my first vegan post. I decided to make something nice for the other half  and when he told me he has tried his hands at Chinese food while I was away in Calcutta I decided I would make a Chinese spread for him. Now my husband is vegetarian which proved to me a challenge since most of the Chinese dishes that I know of are strictly non vegetarian and even the ones with lots of vegetables contain some form of meat.


Well all I did was chuck out the meat and make a braised tofu mushroom for the hubby.


Serves 2 to 3

200gm tofu cut into rectangular cubes
150gm button mushrooms
1 tbsp dark soy sauce
3/4th cup water
2 tsp cornflour
2 large cloves of garlic
1 scallion
1 tsp chopped ginger
1 tbsp oil
2 ripe red chili
Salt as per taste

For the marinate :-

2 tsp rice wine vinegar (or any white vinegar)
2 tsp soy sauce

Oil for frying

Marinate the tofu with the rice wine vinegar and soy sauce for 1 hour. In the meantime mince the garlic and ginger, slice the scallion bulb and finely chop the scallion green and red chili and halve the mushrooms. Whisk the cornflour with 2 tbsp water and make a smooth paste

Now shallow fry  the tofu till its golden brown on both sides. Don't forget to turn them over and take care not to burn them.

Keep aside the  tofu and heat 1 tbsp oil and add the minced ginger and garlic along with the scallion bulb and saute and add the mushrooms. Let it get cooked and sprinkle salt and then add the soy sauce , chopped chili and half the finely chopped scallion green. Saute for 1 minute and add the tofu and after half a minute of tossing them about add the rest of the water and bring to a boil and simmer for 6 minutes or so and add the cornflour mixed with water and keep stirring to make a thick sauce. Garnish with the remaining finely chopped scallion green and serve with some fried rice.


Wednesday, August 27, 2014

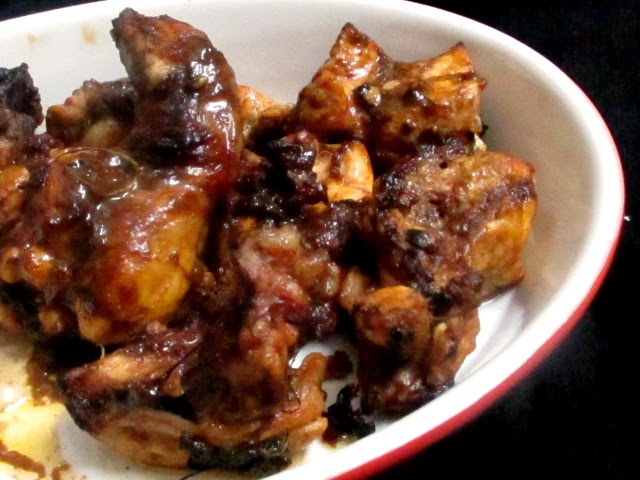
Hot and Tangy Chicken

Hot and Tangy Chicken 


This particular post holds a special place in my heart. It all started when I found a bottle of soy-sauce when I came to Bombay. I was surprised since the only dishes my husband cooks are upma, savoury vermicelli, rice and pulse. It turns out, while I was away in Calcutta he has tried his hands on Chinese food which is why I had decided to make a Chinese spread for him. I would more or less call it a spread with South East Asian or Chinese touch. Now for my husband who follows a green diet it was all about tofu which I enjoyed as well but then I got some chicken breast for myself. The first day I cooked this healthy dish , 'Chicken soy chili with rice and greens , but I still had the other half of the breast and I was suddenly craving Chinese food.


Chinese food and I go way back. In the early 90s when my parents gave me my first noodle from a little joint of Calcutta's old Chinatown in Central Calcutta I slurped it happily. I was apparently 1 year old . What many people might not know is that Calcutta has had its fair share of gorgeous Chinese food ever since some lovely people from China made Calcutta their home somewhere in the  17th Century. In fact Calcutta has two China-town, one in Central Calcutta and one in the Eastern part of the city. Sadly the age old Chinese eateries which serve amazing Chinese food is disappearing one by one and today there are are a handful of them left in the city.

My other connection was when my mother who usually stays away from the kitchen started making Chinese dishes for me when I was around 10 years old or so. What was amazing was that the lady who never otherwise enters the kitchen made gorgeous Chinese food , the only type of food which she ever made along with a few Bengali fish dishes and boy was it gorgeous. It was light , non oily and perfect for me for it was exactly like the ones our favourite Chinese restaurant the now defunct Hou Hua would serve . How and where she learnt those dishes shall always remain a mystery to me but those few dishes which she made till I was a rebellious teenager of 15 years or 16 years will always hold that special place in my heart.


Anyway I have made very few Chinese dishes. I did watch and learn from my mother but later on I was drawn into a vast culinary world where there were so many dishes to try out that these age old dishes remained forgotten. I do always make this quick fix rice with a South East Asian or Chinese touch but other than that the last time I made a proper Chinese dish was when I was 17 years old.

Anyway back to my Hot and tangy chicken  . I wanted to follow a particular recipe but since it had Hoisin sauce which I did not have I made a quick batch of tomato ketchup and made my own version of hot and tangy chicken. For the recipe I would request you to not use store bought tomato ketchup since its usually a lot more sweet and lacks the punch which goes in the homemade one.


So here is the recipe :-

Serves 2


150gm chicken breast cubed into small cubes

For the tomato sauce :-

2 large tomatoes
2 cloves of garlic
Half a large onion
Salt as per taste
2 bird eye chili
Pinch of salt
1/2 tsp sugar
1 tsp olive oil

For the marinate :-

2 tsp dark soy sauce
Salt as per taste

For the sauce :-

3 cloves of garlic
3 to 4 dried red chili (you can lower the number if you can't tolerate too much heat)
Salt as per taste
1 tbsp soy sauce
1 tbsp tomato sauce
1 tbsp sesame seeds
1 tbsp vinegar

Other ingredients for the sauce :-

1 scallion
1/2 tsp finely chopped ginger
2 tbsp corn flour
Salt as per taste
2 dried red chili

2 tbsp sesame oil
1tsp sesame seeds

Start with the tomato sauce. Quickly bring enough water to boil in which you can immerse the 2 large tomatoes. Blanch the tomatoes but reserve the water for later use , peel them and roughly chop the garlic and onion. Then heat 1 tsp olive oil and saute the roughly chopped garlic and onion along with the chilies and add the tomatoes and smash it with a smasher and cook till the water evaporates and now blend this smooth and bring it to a boil with half a cup of reserved water, salt and sugar . (The water in which you have blanched your tomatoes) Simmer this till you get a thick consistency and then blend everything into a smooth ketchup. You will have extra ketchup which I am sure you shall find some use of in the kitchen.

Now for the sauce of the chicken. Soak the garlic , dried red chilies, soy sauce , tomato ketchup, salt and sesame seeds in the vinegar for 15 minutes. In the meanwhile marinate the cubed chicken with the soy sauce and salt. After 15 minutes blend the sauce to a smooth consistency.

Finely mince the green part of the scallion.

Now take a bowl and add cornflour in it and dredge the marinated chicken with cornflour and heat the sesame oil and fry them on both sides on high heat for 40 seconds and low heat , covered for 1 minute on both sides, take care that they stay golden brown. Leave the chicken aside. You shall have some leftover oil in the pan. In the same pan add the minced ginger and sliced bulb of the scallion , dried red chili and when sauteed add the sauce that you have made made and bring to a boil and add the chicken and half the finely chopped scallion and simmer . Now take the bowl in which you had added the cornflour and add 1/2 cup water and make a smooth paste and add to the simmering sauce and let it thicken and cover and let it be for 5 minutes and sprinkle 1 tsp sesame seeds and finely chopped green part of the scallion then serve with hot rice.


Tuesday, August 26, 2014

Chicken Soy Chili with Rice And Greens

Chicken Soy Chili with Rice And Greens 


Sometimes you feel happy and you want to do something special for that other half but I believe in order to give happiness to others you must first feel happy yourself. So I decided to make a spread with a South East Asian cum Chinese touch  for the other half and since my husband follows a green lifestyle I was happily shopping for tofu , bokchoy etc when I realized I was craving some chicken with rice and so voila here I am with one of my favourite lunch ever. Now none of these dishes are any authentic dish from South East Asia or China but have a touch from those cuisines. 


Serves 1

Half a chicken breast weighing roughly 120gm to 130gm
4 to 5 cloves of medium cloves of garlic (In case you are using garlic with big cloves use 1)
1/2 tsp minced ginger
1 tbsp soy sauce
Splash of Chinese rice wine vinegar (If you do not have the Chinese rice wine vinegar just use any white vinegar)
1 tsp tomato sauce (I use my own homemade sauce else blanch 1 large tomato and then blend it and cook it on medium flame in a pan till it gets thick to make a tomato puree)
4 red eye chili (You can decrease the number as per taste)
Salt as per taste (I needed a pinch)

 2 thin slices of tofu / 1 boiled egg

The greens :-
Half a leek
1 scallion
3 to 4 bokchoy leaves with the stem
1 large clove of garlic

2 tsp sesame oil or olive oil

1/2 cup of small grained rice or basmati rice


Start by preparing your chicken by marinating it. Cut the chicken in stripes and then make your marinate by blending together the garlic, ginger, chili, soy sauce , tomato sauce , salt and vinegar and then marinate the chicken and leave it for 2 hours.

Now start by first mincing the garlic clove and finely chopping the leek and scallion green. Thinly slice the scallion blub and then use 1 tsp oil and saute the minced garlic and add the bokchoy and saute for 2 minutes till the greens start softening and then leave it aside. In the same pan add the remaining 1 tsp oil and add your chicken , tofu ,  leek, scallion (both bulb and leaves)  and cover and cook for 1 minute and then turn the chicken and cover and cook for 1 more minute.

Now cook the rice. Simply wash the rice and then boil it with 1 cup of water and when ti starts to boil simmer covered till cooked. Ideally the rice should be a bit sticky.

Once the rice is cooked seperate the bokchoy stems and leaves. Julienne the stem .

Assembling the dish :-

Place the rice in a bowl and add the bokchoy  stem and mix well and then add the chicken and sliced bokchoy stem and mix very well. Serve. Enjoy this healthy hearty dish.


Tips :-

In case you are using egg instead of tofu just boil it and keep it aside and add it in the end when assembling the dish.

Watch this space for more recipes with  South East Asian and Chinese touch coming out very soon


Monday, August 25, 2014

Upma (Savoury semolian pudding)

Upma (Savoury semolian pudding) 


I got introduced to this dish from the Southern states of India only after I was in college. Honestly while growing up, my idea of cooking semolina aka sooji was to make halwa a sweet dish - ghee laden halwa which is extremely good for your soul but not so much for the body and then once I grew up I came across magazines recommending upma a savoury semolina dish for a healthy breakfast or rather a healthy meal.

Turns out, it is actually low in calories and high on nutrition

So here is one of the easiest recipes ever and youjust take less than 15 minutes to prepare it

Serves 1

1 medium sized onion
1/2 tsp finely chopped ginger
1 green chilies finely chopped
1 large tomato
Half a cup of chopped vegetables (carrots, beans , small cauliflower)
A little less than half a cup of semolina

For tempering :-

1/4th tsp black mustard seeds
A few curry leaves
Salt as per taste
Lemon juice as per taste (I needed 2 tsp)
1 tsp oil (I use olive oil but for a traditional recipe try some sesame oil or coconut oil)


Heat the oil and lower flame and add the ginger and saute it and then add mustard seeds , curry leaves , chopped green chilies and onions and cover and cook for 1 minute. Keep checking to make sure it does not burn and then add the tomatoes and beans and saute and cook covered with 1/4th cup water till the water evaporates and then add the semolina and stir well and finally add 1 cup of water and bring to a boil and add salt and keep stirring on medium flame till it becomes a dry dish. Add lemon juice and enjoy a healthy meal. 


Tips

  1. Covering and frying makes sure you fry the onions yet need the minimum of oil 
  2. You must always add salt before you add the water to the semolina because it cooks fast and if you add it later it won't mix evenly in the dish. 
  3. Cubing the vegetables as small leads to quick cooking. 


Saturday, August 23, 2014

Garlic Potato salad

Garlic Potato salad 


Sometimes cooking becomes easy . Well if you have a kitchen where you have all the equipment such as a gas-stove, oven ingredients then preparing a meal becomes much more easy but I came to Bombay all for love and ah well the husband uses an induction cooker. 

Having landed at night the first night was all about some ordered food but today morning once the other half left for some conference or training I was feeling smug about having bought my Darjeeling tea when I realized I am terribly hungry. Here is what I had, tomatoes, some fruits, oats but no milk and just when I was feelign annoyed that I woudl have to go out ah there I spotted one of my favurite things in the world, potatoes.

I looked in the cabinets and there was some extra virgin olive oil, garlic and chili flakes. Well I didn't need anything else. The best part is this dressing can be stored and can also be used as a dip.

So here is a simple recipe for a simple potato salad

Serves 1

1 medium sized potato

For the garlic dressing :-

1 head of garlic
1 tsp chili flakes
1/2 cup of extra virgin olive oil
Salt as per taste
A good splash of white wine vinegar

Simply boil and peel potatoes and blend the ingredients for the dressing. You'l need round about 1/2 to 3/4th  tbsp dressing and you can store the rest for later usage.


Thursday, August 21, 2014

Sajji Murgh

Sajji Murgh 


When I first tried Faiza's Chargha Murgh I was delighted and so I jotted down her recipe for Sajji Murgh and was on the lookout for a special day to make it. Ah well leaving my beloved city for a few months is reason enough. It usually needs a coal pit but Faiza teaches you to make it in the oven and you use a coal for the smoky effect . I did increase the time for marination but I otherwise stuck to her recipe.


Recipe Source : Cook with Faiza

So here goes the recipe :-

1 whole skinless chicken around 1.5 kilogram
1 tbsp salt

For the marinate :-

2 tbsp ghee
1/2 tsp salt
1 tbsp freshly crushed black peppercorn
5 tbsp lemon juice
1 tbsp ginger paste
1 tbsp garlic paste

For the rub :-

1/2 tsp Dry mango powder
1/2 tsp Ginger powder
1/2 tsp Rock Salt
1 tsp Green cardamom powder
1 tbsp black peppercorn
1 tbsp cumin seeds
1 tbsp coriander seeds

A piece of coal
1/2 tsp ghee

This is an overnight preparation. So first you need to submerge the chicken in a bowl full of water with 1 tbsp salt and leave it overnight in the refrigerator.

The next day take the chicken out and pat it dry and now make a emulsion with the ghee, lemon juice, 1/2 tsp salt , ginger paste , garlic paste and freshly crushed black pepper and marinate the chicken rubbing it inside out and leave it for 1 hour to 2 hours.

Now preheat oven to 200C and roast the chicken for 50 minutes turning it midway . Make sure you cover the chicken with a foil when roasting.

In the meantime make your spice rub .Dry roast the cumin seed, coriander seed and black pepper and crush them and then mix it with the remaining spices. After 50 minutes of roasting take off the foil and rub this spice rub which you have created all over the chicken on both sides and roast for another 10 minutes with the foil on.

Now heat the coal over the gas flame and when it smokes take a bit of foil and put it beside the chicken in the roasting tray and add the ghee . This will create the smoke. Now immediately cover with foil and leave it for 10 minutes. Enjoy melt in the mouth soft Sajji Murgh.


I paired it with some Pomegranate raita.


Notes :-


  1. The overnight submerging in saline water makes the chicken ultra soft 
  2. Since you are roasting the chicken without the skin the foil helps retain the moisture 


Rogan Josh with onion , Garlic and Mawal

Rogan Josh with Onion , garlic and Mawal 


I always like trying out different versions of one dish but when there are two distinct versions of the same dish then it is time to make both of them and guess what each version  can hold its own. A few weeks back I had made Rogan Josh as a tribute to the Kashmiri Pandit style of cooking. 

Quite naturally I was eager to make the other version used by the Muslim community in Kashmir but there was one big glitch. This other recipe has to use Mawal aka dried cockscomb flower and I was not sure I would get it in Calcutta. All I can say is I was worried for nothing. I had a faint faith in my New Market and I was hoping that I would get it there. So when Pritha and I went ingredient shopping I went to my old shopkeeper and my problem was solved. He gave me the prim and proper mawal and told me that it is different from ratan jot which is used by many for Rogan josh but is not the original stuff. God Bless this ancient market of Calcutta.

Ah I knew I had to make this delightful delicacy. I even got delightful lamb from New market and treated my friend Anusree before I left for Mumbai for 3 months. This leaving of my own city always make sme feel depressed. Its a whole other thing that my green husband doesn't touch any meat but I guess I love my city an emotion I was made aware of only post marriage.


Anyway back to the recipe. I followed the Waza Brother's recipe and here it goes :-

1 kilogram lamb
1 tbsp garlic paste
100gm clotted ghee / 1 cup of melted ghee
Salt as per taste - I required 2 tsp
8 green cardamom
4 cloves
1 tsp ground black pepper
A fat pinch of saffron soaked in little water
1 cup of Mawal aka cockscomb flower steeped in 1 cup of boiling water
1/2 tsp turmeric
1.5 tbsp Kashmiri Chili powder
1.2 litres of water
3 onions

Wash the meat well and bring the water and meat to a boil in an open pressure cooker and take out the scum that forms and then add salt and garlic paste and turn the heat down to the lowest possible flame and put the lid on and let the pressure build up on its own. After the first whistle switch off the gas-stove and let the steam come out on its own.

In the meantime heat 2 tbsp ghee and fry the chopped onions and then cool it down and blend it. Bring the mawal and the water to a boil and then cover and leave it. Soak the saffron in a bit of water.

Now open the pressure cooker and take out the meat. Bring the stock to a boil.    

In the same pan in which you have fried the ghee heat the rest of the ghee and temper the cloves and when they splutter switch off the gas and add 1 tbsp water and cover it.

Now add the crushed cardamom to the boiling stock and lower the heat and add the meat, onion paste, turmeric and the ghee with the cloves and then bring it to a boil and boil on medium heat for 10 minutes. After 10 minutes  add the Kashmiri chili powder, strain the Mawal water and add it and then and saffron soaked in water. Simmer for sometime and serve with hot plain rice.


Wednesday, August 20, 2014

Brioche au Chocolat

Brioche au Chocolat 


'Rain drops and roses and whiskers on kittens ......these are a few of my favourite things.'

 Well roses and kittens are definitely some of my favourite things but when it comes to ingredients and the kitchen here are a few items I love working with. I love whisking egg whites to soft or firm peaks and using it, I love using butter , ghee, I love the freshest of vegetables and I love working with yeast among a few of my favourite things to do in the kitchen.


It was my very first attempt at making Brioche au chocolat that delightfully rich French bread made with lots of butter and eggs , the filling of chocolate was entirely an added bonus.

When you have a perfect recipe to follow you usually find success.

I followed Croquez, Craquez's recipe (A french blog) and I had the most soft rich delightful bread ever

So here is the recipe :-

Makes about 10 brioche

For the Brioche :-

250gm All purpose flour
25gm Castor Sugar
5gm Salt
3 Eggs
100gm Butter
15gm fresh yeast / 7 gm dry yeast

Yolk from 1 egg for brushing

For the filling

150gm chopped chocolate

Proof the yeast by dissolving it with 4 tbsp lukewarm water and  sprinkling a bit of sugar. If it forms bubbles and becomes frothy after 10 minutes its good enough to be used.

Mix the ingredients for the brioche except the chocolate and leave in the refrigerator for 4 hours. It would have doubled in size. Now punch it down to remove the carbon dioxide and make 10 ball. Flatten the balls and using a bit of chocolate as filling and then roll it back to form a rectangular shaped brioche and leave it on a tray which has been buttered and floured to rise for 45 minutes if you stay in a tropical country or 1.5 hours in cold countries.

Preheat oven to 180C , brush the brioche with the whisked yolk and bake for 25 minutes.

Let it cool down completely. Then either have it immediately or use a cling film to preserve the freshness.


Chocolate Cake (Felicity Cloake)

Chocolate Cake (Felicity Cloake) 


Over the years I have baked many a chocolate cake yet I still kept searching for one which would have the perfect fluffy soft texture and then one day I realized I should search for Felicity Cloake's version of the perfect chocolate cake. Here let me say that I firmly believe that there cannot be one perfect chocolate cake for everyone. Some like it fudge like, some like it extra airy but for me ah for that read along my friends. 


The lady in question, Ms Cloake  tries out different recipes by many a maestro and gives you the pros and cons of each recipe and finally shares the recipe for one which she deems is perfect for her taste buds. She says this cake is 'Not a torte, not a mousse, but a cake which actually tastes of chocolate: fluffy and light enough to eat at tea time, rich enough to serve with a dollop of creme fraiche for dessert'


Now there is a particular reason why I trust this lady. I tried her perfect recipe for Mousse au Chocolat and I must say there is no looking back for me. It was just perfect,  rich yet light and delicious and so quite naturally I knew this description of the chocolate cake would not fail me.

 I tried a simple frosting of tempered chocolate in-between and some chocolate to cover the cake. I would not go as far as to say it is perfect but it is pretty good.


Recipe adapted from Felicity Cloake

The cups used hold 250ml of liquid

50gm dark chocolate
50gm chocolate chips
250gm of all purpose flour (1.5 cups)
250gm of Brown sugar (3/4th cup)
250gm of Unsalted Butter
250ml of milk
100gm of cocoa powder (3/4th)
2 tsp baking powder
3 eggs
Pinch of salt

Extra flour and butter to prepare pan

For the frosting

100gm dark chocolate tempered properly to create a silky melted chocolate

Prepare your two cake tins ( 8inch) by buttering it and then dusting it with flour. (An 8 inch pan would do)

Start by sifting the flour, cocoa powder and baking powder .

Now Cream your butter and sugar till its fluffy and add the eggs one by one and the salt and whisk till its a creamy fluffy affair.

Preheat the oven to 180C at this point . Slowly fold in the sifted dried ingredients and then add the melted chocolate and fold it in . Add the milk bit by bit and fold that in as well. Finally add the chocolate chips.

Divide the batter in two equal halves and pour the batter into the cake pans and tap the pan and then wet your hands and lightly smoothen the top and bake in the preheated oven for 25 minutes to 35 minutes .

Once baked insert a toothpick in the middle and if it comes out clean its done.

Let the cake cool down in the pan for 15 minutes and then run a palate knife around the edges and invert it on a rack and cool it.

Only when the cake is completely cool can you now move on to frosting.

Simply temper the chocolate over a double boiler and cut the cake in half and spread the chocolate. Sandwich the cake together cover the cake with chocolate and serve it as it is for tea or add a dollop of whipped cream and make it a delicious dessert.


Important tips :-


  1. Once you are down with adding the whisk you must not use the whisk because the crumb of a cake largely depends on the technique of folding in the dry ingredients else you end up with a dense cake. The idea is to not knock off any air bubbles even though the cake is batter based and so it uses baking powder.  
  2. Once you have poured the batter in wet your hands and smoothen the top and which leads to an even top baked cake. Do not firmly press your hands on the batter just gently press it. 
  3. Always allow the cake to completely cool down before slicing it to apply frosting else your cake will break. 
  4. In case you use a bigger cake tin you must increase the amount of batter. If you double the recipe use a 9 inch cake pan. 
  5. In case you use salted butter then leave out the extra salt 


Monday, August 18, 2014

Balsamic Honey Grilled Chicken

Balsamic Honey Grilled Chicken 


So this is what happened I had a good amount of balsamic dressing which was a leftover from Lunch and so I marinated a few pieces of chicken in the dressing grilled it and had this delightful sweet and sour grilled chicken.


Its easy

Take 1 leg + thigh minus the skin of a chicken

For the marinate

1 tsp honey
1 tbsp balsamic vinegar
1 tbsp Extra virgin olive oil
Salt as per taste
1/2 tsp paprika

Just marinate and grill till the juices run clear. Don't forget to turn the chicken midway through grilling


Tip

Place a steel tray beneath the rack on the chicken is beign grilled so that the juices fall on it . You can brush the chicken when you turn them with this and later soak a bread or chapati so that you get the awesome flavour.


Roasted garlic dressing

Roasted garlic dressing 


Don't you just love it when you accidentally discover a recipe which you immediately love and what more its a bonus when you tweak it to make it absolutely healthy. 

I am tired of vinaigrette. I mean I like a healthy low calorie dressing for my salads and the usual common easy option are different  vinaigrette and so I was browsing through Martha Stewart's website when I suddenly came across this Roasted Garlic dressing. Ah for a garlic lover such as myself I knew it was the right recipe but the original recipe had sour cream among other ingredients and so I tweaked it and had a fabulous salad . You can use this as a great dip as well.

Serves 1 to 2

200gm curd which you have to drain by hanging
1 head of garlic
1 tbsp olive oil
Salt as per taste

For the salad :-

1 wedge of iceberg lettuce

Start by first hanging the curd to drain it of all the water. Preheat the oven to 200C and then take a foil and place your garlic head and lop off a bit from the bottom and pour the olive oil wrap the foil and roast for 40 minutes to 50 minutes. Once done let it cool down and squeeze out the creamy roasted garlic and smash it with a fork and then add the hung curd and whisk well and add salt.

Pour it over the ledge of iceberg lettuce for a delightful creamy garlicky meal


Balsamic Honey Paprika Bell Pepper Salad

Balsamic Honey Paprika Bell Pepper Salad 


For me a salad's success largely depends on the dressing. I don't mean that I would want my salad to be drenched in the dressing but a good dressing can definitely make a boring salad extremely delicious. 

I believe it is only balance alone which keeps everything in its place. Just like you vcan't simply keep on indulging in unhealthy fattening food you can't go on eating low calorie salads without a break. A break I did take last Saturday with an indulgent meal which included a cheese tart and brioche au chocolat so it was time for a nice healthy low calorie salad again . With a tangy sweet and sour dressing this salad is a keeper for me. The dressing is a classic one with a tiny twist

Serves 1

2 small tomatoes
Half a red bell pepper
Half an yellow bell pepper
1 tbsp dried cranberries
2 dried prunes

For the dressing

1 tsp honey
2 tsp balsamic vinegar
1 tbsp extra virgin olive oil
1/2 tsp paprika
Salt as per taste
1/2 tsp finely chopped mint leaves

Chop your salad to make long stripes and chill it for 1 hour. Just before serving whisk together the ingredients mentioned in the dressing to create an emulsion and pour over your salad and enjoy this tangy sweet delight.


Tuesday, August 12, 2014

Rajma

Rajma 


Truth be told I don't know when I fell in love with Rajma. It might have been that time when we passed through Delhi or in that beautiful place in Punjab whose name I cannot remember since I was 7 years old or 8 years old. At home my father would make Rajma but it was nothing like the delightful Punjabi ones. He always added paneer for one thing and would sometimes make this delicious dish with meat added to Rajma but by the time I reach my teenage years and had a taste of some good rajma in this Punjabi Dhaba I knew I loved it and it would always be my comfort food.


Over the years I have followed a couple of recipes all of which were delightful yet I kept trying different recipes which means somewhere in my heart I was not fully satisfied and then last year I came across this beautiful blog run by a Punjabi Kudi as she calls herself and tried out her recipe and I knew it was the right one for me. It was thick and hot and was deliciously tasty with the minimum use of spices. I follow this lovely lady's blog.


Before I move on I must say I always keep some homemade Punjabi garam masala at home which gives the dish that special flavour. This garam masala differs from household to household in Punjab . I basically use this recipe given by a wonderful friend of mine from the land of five rivers and it needs  Black cardamom,  Cloves, cumin seeds, coriander seeds and bay leaves and peppercorn.

So here goes the easy recipe

Makes 3 to 4 servings

1 cup of rajma washed and soaked overnight
1 large onion
1 tsp coarsely chopped ginger
1 tsp coarsely chopped garlic
1 large tomato
2 green chilies slit lengthwise
1 tbsp finely chopped coriander leaves

Spices

1 tsp cumin seeds
1/2 tsp turmeric powder
1 tsp red chili powder
1/2  tsp garam masala
Salt as per taste

3/4th tbsp ghee

1 tbsp butter (optional)

Wash and soak the rajma and then pressure cook it over low heat till its soft and well cooked.                        In the meantime coarsely chop the onion, garlic and ginger and blend it smooth in a blender. Chop the tomatoes and finely chop the coriander leaves.

Now heat the ghee and add the cumin seeds. When they splutter add the onion ginger garlic paste and keep stirring till the raw smell goes away and add the tomatoes and green chilies  and cook on high flame for 50 seconds and lower heat and keep stirring till you get a nice paste and the paste seems glossy . Now add the rajma , salt, turmeric, red chili powder and garam masala. Bring to a boil and simmer for 10 minutes.

Serve with plain basmati rice.  You may or may not add the butter once the rajma is cooked. I usually leave it out for a normal day serving.


Monday, August 11, 2014

Healthy Leek and Potato Soup

Healthy Leek and Potato Soup 


For me the perfect weekday dinner is a warm hearty soup. Sadly most creamy soups come with a heavy price. I mean laden with butter or cream it sure tastes amazing but it is a heavy price to pay for that expanding waistline. I had fresh leeks in the refrigerator and so I looked up recipes for a leek and potato soup. The potato would give me the required carbohydrate and it would be a creamy soup. Most of the recipes contained a good amount of the forbidden ingredients. So I made a basic soup which is simple and with minimum usage of ingredients it brings out the flavours of the leek and is a hearty healthy treat


Serves 1 to 2 (depending on how this is served, if its just the first course it should be divided between two else it makes for a healthy meal by itself)

2 medium sized potatoes
Half a large leek
1.5 cups of chicken stock (cups which hold 210ml of liquid)/ vegetable stock
Salt as per taste
Half a cup of skimmed milk
A bit of finely chopped parsley for garnishing
Half a tbsp olive oil
1/2 tsp extra virgin olive oil  (optional)


Simply wash and peel the potatoes and cube them and then finely chop the leek . Now heat the olive oil and lower the heat and add the potato and leek and saute and then cover and let it be for half a minute and stir it and add 1 cup of  chicken stock and bring to a boil and then simmer covered for 8 minutes to 9 minutes to 10 minutes. Now let it cool down for 5 minutes or so and blend it smooth in a blender and add the remaining chicken stock and milk and now put it back in the pot and bring to a slow boil while stirring in continuously.
Serve it hot with the finely chopped parsley as garnish. You may add the extra virgin olive oil or not depending on your preference.


Tips :-

For the last boil be very careful to stir continuously because the soup would be of a very thick consistency and can easily form lumps.

Low calorie Creamy Egg Carrot Salad

Low calorie Creamy Egg Carrot Salad 


So you have indulged a bit on Sunday which is much deserved well then Monday is all about the balancing act again but hey if you want a creamy dressing there is no need to worry here is a healthy creamy recipe which uses neither cream nor cheese nor mayonnaise nor butter.


Serves 1 for a principle meal :-

1 large carrot chopped to make  matchstick carrots
2 eggs which are hard boiled
1 cup to 1.5 cups of lettuce leaf kept whole

For the dressing

250ml curd hung to make it thick . In case you are using thick yogurt use about 5 to 6 tbsp
1 tbsp Extra virgin olive oil
1/2 tbsp balsamic vinegar
3 medium sized minced garlic cloves
1 tsp finely chopped fresh parsley
Pinch of chili flakes
Salt as per taste

Simply chop the carrots and then chill it with the lettuce leaves. Now whisk the ingredients for the dressing and mix the carrots in it and chill.

Boil the eggs by bringing the eggs to a boil with water and a pinch of salt and boil for 2 minutes and then cover and leave for 3 more minutes, crack the shell and slice the eggs .


There , a healthy creamy salad