Showing posts with label Bengali. Show all posts

Thursday, April 23, 2015

Kancha Lonka Murgi II


Kancha Lonka Murgi II 


I rarely cook a special dish without following a recipe from an old cookbook or a cookbook by a chef I trust and I mostly stick to a recipe when I follow it which is why on that rare occasion when I make a recipe without following any recipe and go with my flow it instantly becomes special to me especially if I love the taste and more so if the people who taste it like it.

Now if you cannot stand heat and I meat hot and spicy food where the heat comes from chili then this particular recipe is not for you. It is called Green chili chicken for a reason.

What I most like about the dishes from my roots that is Bengal is how many of its recipes especially when meat is concerned is cooked sans garlic and onion and it yet turns out delicious.

Last year I made this 'Kacha Lonka Murgi' kancha lonka = green chili and Murgi = chicken following my friend Priyadarshini's recipe which used garlic and ginger paste and green chili.

This time I created my own recipe sans the garlic and I have to say I absolutely loved it. One other factor which is crucial is the use of mustard oil. This dish just simply cannot come out well without that strong flavour of mustard oil.

You must serve it with hot piping rice for a beautiful experience.


Makes approximately 4 to 5 servings :

1 kilogram chicken
40 green chilies made into a smooth paste using water. (The number of chilies depends largely on their strength of heat so start with 30 green chilies and if it doesn't taste hot enough use 40. I used 40 of them)
1 tbsp smooth ginger paste
3/4 tsp nigella seeds
1/2 tsp radhuni (optional)
4 tbsp mustard oil
Salt as per taste

Marinate the chicken with the ginger paste and some salt for 1 hour to 1.5 hours. Now heat the mustard oil and when its smoky turn down the heat and add the nigella seeds and radhuni if available and when it splutters add the chicken and sear it on high heat for 1 minute and stir and then simmer on the lowest heat possible covering the pan and let it cook on low heat for 7 minutes and add half the green chili paste and 1/4th cup of water  and keep cooking on low heat for another 10 minutes or so and add the rest of the green chili and cook for another 5 minutes and let it rest for 7 minutes to 10 minutes and serve with piping hot rice.


Friday, April 3, 2015

Chicken Khirmich Pulao

Chicken Khirmich Pulao 

(Murgir Khirmich Pulao)


If one asks me about the exact moment when I got so interested in the kitchen I would not be able to give the person a straight answer. Part of it was because my mother who always stays away from the kitchen had taken up cooking delicious Chinese food when I was about 11 years old. It was more so delightful for me because I was usually an ostracized person in groups where people of my age group would brag about their mother's skill in the kitchen. What amazed was how close my mother's Chinese was to the food of old Chinatown from Calcutta. Unlike my friends who brought greasy Chinese which was doused in soya sauce or lacked the flavour my mother made balanced mild flavoured Chinese food which had amazed me. I had later learnt that she had learnt this from a friend who had studied hotel management. Then came a period when as with many teenagers I had a dramatic relationship with my ma and she stopped cooking and focused on her love of mountains. So perhaps it was to taste her delicious dishes that I started cooking Chinese food the ones she made at home. She had shared the recipes. That will be for another post.

If I close my eyes I see myself salivating while reading Enid Blytons books and the descriptions of picnic baskets and having this urge to taste all of them but the truth is I grew up among my maternal grandmother and aunt (mother's brother's wife) who left a deep impact on my mind about cooking. While my mother was the fiery no nonsense woman who was rough and tough I grew up in a world of drying lentil dumplings and making lip smacking Bengali dishes. My aunt's influence and an urge to imitate her filled me with an intense desire to learn the way she would render her magic to dishes. She is like a mother to me and taught me all that she knew about Bengali cooking encouraging me and appreciating my efforts.

What I learnt from her was mostly what had been passed down by her mother some 40 years ago hence I have the greatest regard for tradition when it comes to cooking.

Much later I realized that if I do really want to know about my Bengali culinary roots I must do what I believe if the only way to gather knowledge, that is read books.

What I discovered has left me brimming with pride for imagine this in Bengal women were publishing cookbooks at a time when emancipation for women was unheard of in most parts of the world.


Saturday, February 14, 2015

Bengali Five Spice Chicken (Inspired by Antara's Achari Murgh)

Bengali Five Spice Chicken 

(Inspired by Antara's Achari Murgh) 


This week our star is Antara of ' Antypasti ' I met Antara in my initial days of blogging It was my first Kolkata Food Bloggers' meet and it was great fun to meet this vivacious person. She runs a travel cum food blog and to me it is quite apparent that she loves the landscape and food from the North East region of India which is very fascinating for someone such as myself who has neither been to the land of the Seven Sisters and has practically no knowledge about the cuisine from North East except for the fact that one gets excellent pork in Meghalaya and as I have learnt from her blog and other food enthusiasts that the entire region makes excellent pork dishes.

Having said that the only time I have been to the North east was way back in 1996 as a child and what I remember is staying at a family friend's house where the grandmother of the house made some excellent dish out of squash which is a type of vegetable.

Anyway moving on to our star of the week. I had initially decided on her Pork curry which was extremely simple and which reminded me of the chicken curry that my friend Elizabeth from Mizoram had prepared for me a long time ago.She is my college friend and when she was studying in Kolkata I had the good fortune of visiting her in her hostel where she made this lip smacking chicken curry and I was extremely surprised when she shared the recipe which hardly contained any spice at all and yet it remains one of the tastiest chicken curries that I have ever tasted. Antara's pork curry is exactly like Elizabeth's chicken curry and so initially I had decided on that but then I am traveling to Delhi for a trip and so I had to opt for some other dish and the Achari Chicken caught my attention mostly because it uses the Bengali five spice and I have never used Bengali 5 spice to make chicken curry and this intrigued me greatly and so I quickly adapted the recipe to suit the ingredients I had at home and the result was lip smacking chicken curry which vanished in no time.


To be fair the way I prepared it makes it appropriate to be taken with Rice  but then you can always adapt this to suit your requirements. I wanted it really hot and used a lot of yellow chili power which happens to be my latest obsession.

Do take a look at Antara's Foreign Returned Achari Murgh .

Before I begin let me assure you that the Bengali five spice varies from home to home and while some use cumin seeds others use a local spice 'Rahuni' which has its own unique flavour

400gm chicken with bones (preferably from the leg an thigh)
1 tbsp Bengali five spice( An equal amount of mustard seeds ,Fenugreek seeds, Rahuni , Kalonji and Fennel seeds)
2 tbsp mustard oil (I used spice mustard oil since I always keep a jar of homemade Spice mango mustard oil 'Aaam tel' at home but otherwise the normal mustard oil would do)
1 tbsp smooth ginger garlic green chili paste (I used 2 hot green chili)
2 heaped tsp yellow chili powder or Paprika or Kashmiri red chili powder
Salt as per taste
1 tsp freshly ground black pepper
1 tbsp whisked curd
Pinch of turmeric
2 tbsp finely chopped fresh coriander leaves

Marinate the chicken with the curd  ginger garlic chili paste  freshly crushed black pepper and salt for 2 hours. Heat the oil and when it reaches its smoking point reduce the heat and add the 5 spice and once they splutter add the chicken and seal its juices on high heat for 1 minute stirring it constantly and then add the yellow chili powder and a bit of water and cook  covered on low heat till the oil separates taste an a salt if required and add the finely chopped cilantro and enjoy it with hot steaming rice.

Tip

Reducing the heat once the oil reaches its smoking point ensures that the spice does not get charred


Wednesday, February 11, 2015

Bengali Fish Fry


Bengali Fish Fry 


The Bengali fish fry is this crunchy breadcrumb coated delicious snack. Served with the piquant Bengali mustard sauce 'kasundi' and some thinly sliced cucumber and onions this makes for a superb snack.

To be fair the fish used in this recipe plays a major role. So yes, Bhetki aka Barramundi is irreplaceable for the Bengali fish fry.
I prefer my fillets to not be too thin or too thick so usually I purchase a 1kg to 1.5 kg Bhetki and then get about 16 fillets from it.


Serves 4 to 5 people

9 fillets (Bhetki/Tilapia) weighing 370gm  in total
2 tsp thick smooth garlic paste (Garlic paste can be smooth and watery or thick and smooth,  I used a number of garlic cloves to make it thick an smooth)
Juice of  1 Tbsp ginger paste 
Approximately 2 tsp onion paste which must be extremely smooth
2 tsp green chili coriander leaf paste  
Salt as per taste 
1 tsp freshly ground black pepper 

For the dipping batter
1 cup gram flour
Pinch of salt
1 tsp ginger garlic paste
1tsp
Sufficient water to make it to a dripping consistency

3  cups bread crumb

Mustrad oil for frying 

Marinate the fillets for about 1 hour to 2 hours
Make a smooth batter -  If the batter if too thick it does not coat the fish well and the coat keeps coming off from the fish .
Dunk the fillets in the batter and then pat it with  breadcrumb making sure the breadcrumbs coat the fillets without leaving any spots. 

Important tip :-


  1. If you use high heat while frying the fish easily becomes blackened on parts which is unwanted. 
  2. Make sure you keep changing the oil when there is some residue at the bottom of the wok. In my experience this prevents the fish from crisping up. I do not know why this happens though.

Enjoy this lovely snack with some Bengali mustard base condiment (Kasuni)  onion rings 


.


Sunday, January 11, 2015

Nolen Gurer Payesh (Plam date Jaggery rice pudding)


Nolen Gurer Payesh 

(Plam date Jaggery rice pudding) 


Poush Sankranti is the festival of harvest.

Now I had initially decided to learn how to make fried 'Pithe' from my grandmother but then somehow I couldn't get over the idea of smooth creamy rice pudding or payesh as we call it.

To be fair one who has not tasted 'Noel gur' (Date palm jaggery) would not understand that delightful taste which all of Bengal can't get enough of during the winter season. To be fair these days much like everything else on offer this winter's delight is available much before autumn sets in but if you ask the pros they still advice you to use it when its supposed to be used, which is during the chill of the winter season from somewhere in mid December.

Now coming back to the Festival of harvest when it comes to harvest I cannot but have fond memories of acres of rice paddy which we own in Burdwan. My family had moved to the big city more than a century ago and we are what one would call essentially city dwellers living in the heart of the metropolitan city of Calcutta but we come from a district known for its beautiful variety of rice, Burdwan.

As a child my parents would take me to our village every 15 days and it would get me far from the madding crowd. I distinctly remember the voice of that lonely bird while I sat on the roof reading Malory Towers while the entire village and the fields beyond it lay in front of my eyes. I could see them from our roof and then I would set out with my father for a walk through the paddy fields.

I was essentially a free bird in the village. In the city I was sequestered in our home but every time we visited the village I could play all around the village and I had friends from every nook and cranny of our village.

What I remember most about my village were these huge storage of rice. Everybody in the village grew rice as did my family and they still do thanks to some loyal and honest help from some good people and every woman of every household would be bent over this fire made from wood and brick and stir a huge pot to make puffed rice.

As a result I almost make an instant connection with rice when I think of harvest.

I am sharing a classic recipe for Rice pudding made with Date Palm jaggery . To me the rice pudding should neither be too thick nor too thin and should have this creamy consistency. Usually people add raisins and cashew nuts to rice pudding but when I use Palm date Jaggery I refrain from using anything else so that the taste kind of remains classic.

This recipe has been passed down by my ant's mother and I was lucky enough to get hold of it. What is essential is the timing.

Makes about 6 servings :-

1 litre of full cream milk
3/4th tsp melted clarified butter or butter
1 handful rice which comes to about 1.5 tbsp heaped washed short grained rice
Palm date jaggery as per requirement (I needed about a little more than 1 handful of crumbled jaggery)
1 green cardamom
1 large bay leaf

Wash the rice thoroughly and then take a heavy bottomed pan and add the rice and milk and clarified butter with the bay leaf and crushed green cardamom and bring to a boil while stirring the pan constantly and then lower heat to the lowest possible temperature and let it simmer.

Stir the pot every 7 minutes so that the consistency remains smooth and the milk doesn't get stuck to the bottom of the pan.

After 30 minutes you would see the rice boiling well. keep stirring every 2 minutes and check at 50 minutes and dd the jaggery and keep stirring for another 3 minutes to 5 minutes and switch off the flame and let it cool down.


Chill and enjoy this winter delicacy

Important tips :-


  1. Never ever add the jaggery before the rice is fully cooked else the rice will remain raw 
  2. The addition of clarified butter keeps the consistency to a smooth creamy one 
  3. It is essential that you use short grained rice. 


This is part of :-

Kolkata Food Bloggers' ongoign event 'Poush Sankranti Specials'


Monday, October 13, 2014

Malai Chop and an aunt's Love

Malai Chop and an aunt's love


I can just call this my Calcutta Connection. Well I'l be honest once you start making sweets at home it becomes an addiction. I am passionate not just about sweets but about cultures because for me it through food that I can communicate with the entire world.


'Malai Chomchom' is a much loved sweet dish from Bengal where flattened or cylindrical shaped cottage cheese is boiled in thin sugar syrup and then soaked in slightly thickened milk. It is an absolute delicacy but then the recipe I am sharing today is extra special for me. I have a beautiful aunt who would often come over to our place with a big case of delightful  white Malai Chomchom but these malai chom choms had a coat of milk which was thickened enough to stay put on the white beauties. Now that I think about it I haven't ever paid attention to the name of the shop from where my darling aunt would bring one of my favourite sweets but now I can easily make it at home and so can anyone who is reading this.


Sitting in Bombay I miss Kolkata and so on an ordinary Saturday I decided to make these sweets from my memory. Having previously made roshogollas , pantuas, chanar jilipi , jalebi I was more or less confident enough to not consult any recipe and my confidence was well rewarded with a husband who usually doesn't like sweets yet gobbled up 3 and 3/4th malai chomchoms out of the 5 that I made 

Makes 4 Malaichochoms and a semi mini malai chomchom

1 litre full fat milk and it must be full fat
7 tbsp sugar
3/4th tbsp vinegar diluted in 3 tbsp water
1 tsp sugar
3/4th tsp semolina
tiny pinch of bi-carbonate of soda

For the syrup
1/2 cup sugar granules
5 cups of water
2 green cardamom

2 tbsp pistachios blanched and finely chopped

Start a day ahead by first making the condensed milk. Simply take 500ml of the milk and 7 tbsp sugar in a heavy bottomed pan and simmer it on low flame stirring it from time to time. Once the milk turns beige , thick and starts bubbling you must keep stirring it continuously and then cool it and blend it in the food processor / mixer grinder. Chill it in the refrigerator. The process takes about 45 minutes to 50 minutes.

The next day bring the milk to a roaring boil and lower the heat and add the diluted vinegar and let the cottage cheese form well so that in the end you have snow white cheese floating in a green liquid. It takes 2 minutes. Now switch off the gas-stove and cover and leave for 5 minutes . Then gather the cheese in a cloth and drain it for 15 minutes to 20 minutes and then take the cheese on a wooden board and knead well rubbing the cheese against the wooden board and gathering it and kneading it. After 3 minutes of kneading add the semolina , baking powder and 1 tsp sugar and knead well. Knead well for a good 15 minutes. The softness of the dessert depends entirely on the kneading. Make a large ball and divide it into 5 parts and make discs out of them.

Now bring the sugar and water to a boil and add the green cardamom . make sure that the pan is large enough to hold all the cheese discs side by side. Lower the heat and add the discs and cover and boil on medium heat for 15 minutes. It is essential that you keep lowering the temperature and increasing it in-between. Once done keep it covered for 10 minutes to 15 minutes and then take off the cover. Once the discs cool down place them on a tray and soak them with the thick condensed milk and garnish with pistachios and chill for 4 hours to 5 hours before serving.

Enjoy these soft milky creamy delights.

Very important tips :-

  1. It is extremely important that you use the tiniest pinch of bakign soda else your discs will break when they are being boiled in the syrup. 
  2. The softness of the discs depends entirely on the kneading , so knead as much as possible , your dough should be melt in the mouth and ultra soft 
  3. When you make the syrup remember that it is the thinnest syrup possible so once the sugar gets dissolved in the water after you have started boiling it immediately lower heat and add discs.  


This is part of Kolkata Food Blogger's  Ongoing event 'Deepavali, Festival of Lights with Sweets and Savouries'


Saturday, October 4, 2014

Payesh/ Bengali Kheer/ Payasam

Payesh/ Bengali Kheer/ Payasam


One of the most basic Indian desserts is the Rice Pudding. It goes by many many names be it Payesh in Bengali, Kheer in Hindi, Payasam in tamil and telegu, payasa in Kannada or Khiri in Oriya.

Its an easy basic recipe indeed yet perfecting it is really an art.


To be fair I am fortunate enough to have an aunt like my Mimi who can perfect each and every Bengali recipe. Now the problem is once you have had the perfect dish or to be politically correct lets say its perfect for me then it is difficult to enjoy any other variations which falls short of being perfect. As a result throughout my childhood and adulthood the only place I would relish this decadent creamy dessert was at my Mimi's (even my grandmother's kheer pales in comparison to my Mimi's) till the day I asked her to teach me how to make it.

The best part about Mimi as a teacher is that she tries and explains each step and gives me the reasons wherever possible.  This one is neither too thick so that the creaminess is overshadowed by the rice clotted together and nor is it too liquid in nature. Its just right.


This is one of the desserts I have made again and again and again from a very long time and so here goes a simple easy recipe which I have tried to keep as precise and detailed as possible

Recipe :

Makes about 4 to 5 servings

Cups used hold 220ml liquid

1 litre full fat milk (you cannot use toned milk else it will most definitely compromise the taste)
1 handful of . rice washed thoroughly (it comes to about 1/4th cup of rice ) { This rice is short grained and sometimes it is sold as kheer rice in many places, it is called Atop Chal or Gobindobhog chal in Bengali)
1 handful of sugar + 2 tbsp sugar but you must change the amount of sugar as per taste
2 green cardamom
1 large bay leaf
50gm broken cashew nuts
Fat pinch of saffron soaked in milk
1 tsp ghee

Bring the milk to a boil in a deep bottomed pan and the ghee , green cardamom and bay leaf  . Adding the ghee keeps the dessert extra smooth.

Now reduce the heat to the lowest possible temperature and add the washed rice and simmer it. Use a wide spatula to stir the mixture every 10 minutes for the next 45 minutes make sure the bottom of the pan does not burn.

Add the cashew nuts after 45 minutes.

After 50 minutes of simmering it with frequent stirring check the rice . It would have been cooked by now and will be of a melt in the mouth consistency. Now add the sugar . You must not add sugar before the rice is fully cooked else the rice remains uncooked.

You must stir continuously for the next 10 minutes to 15 minutes to prevent the dessert from sticking to the bottom and getting ruined. After 10 minutes add the soaked saffron and simmer while stirring continuously for another 2 minutes and switch off the gas.

Let it cool down and chill it for 3 hours to 4 hours and serve after giving the dessert a good stir. You must stir before serving because a thick cream will form on top which must be mixed well with the desert for the creamy smooth consistency.


Enjoy this classic delicacy

Tip


  1. During the winters we get a special jaggery called 'Nolen Gur' in Bengal which is palm date jaggery and we repalce the sugar with the jaggery and it gives a divine taste. 
  2. Many people love adding raisins to the dish. If you wish to do so add it when you are adding the cashew nuts. 
  3. You can replace the cashew nuts with blanched  pistachios or blanched and chopped almonds. 


Tuesday, September 30, 2014

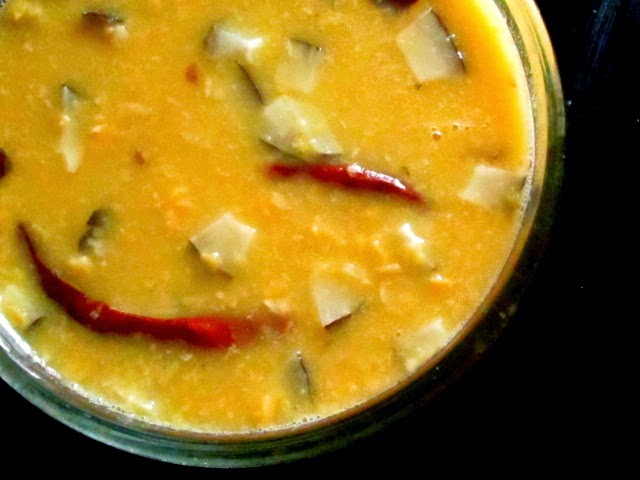
Cholar Dal (Bengali Chana Pulse)

Cholar Dal (Bengali Chana Pulse)


There is little to be said about this Classic Bengali Pulse. Bengalis  cook this  for all special occasions be it the Pujas, weddings, rice eating ceremony, gathering of friends and family or just for a special Bengali meal. You can team it up with all purpose flour pooris which Bengalis call 'luchi' or hot steaming rice and julienne potato which is deep fried .


The bottom line is that, this is a classic dish. Now its mostly the same recipe followed everywhere with a few variations. Here is one that I know of passed down by my Mimi (aunt) whose mother had passed it down a long time ago.

Serves 4 to 5

1 cup Chana pulse 'cholar dal'
1 tbsp clarified butter 'ghee'
2 green cardamom
1 tsp finely chopped ginger
2 to 3 dried red chili
Half a cup diced fresh coconut
A handful of raisins
Salt as per taste
Pinch of turmeric
Sugar as per taste (Now, traditionally  this pulse is supposed to be a bit on the sweeter side so I would personally use 1 tbsp to 1.5 tbsp sugar but you can adjust as per your taste)
4 cups of water
1 large bay leaf

Soak the pulse for 1 hour and then pressure cook it on low flame till 1 whistle to 2 whistles and let the steam go out on its own. It should have cooked by that time.

Now heat the ghee and add the ginger and saute and then add the cardamom , bay leaf and red chilies and keep sauteing and then add the coconut and raisins and finally the pulse. If it seems too thick add 1 cup of water and bring to a boil and add salt, turmeric and sugar and simmer for 10 minutes. It should be of a medium thickness and the pulse must retain their shape. Its traditionally supposed to be a thick pulse but not as thick as the North Indian Mah ki Dal aka Dal makhani


Monday, September 22, 2014

Chanar Jilipi (Cottage Cheese Jalebi)

Chanar Jilipi (Cottage Cheese Jalebi) 


 There comes a time of the year when the entire state of Bengal gets intoxicated with celebrating the Goddess Durga.


Now the whole of India loves jalebis , fermented deep fried soaked in syrup ,its crunchy and sweet and delicious but then it is only in Bengal that we have Chanar Jilipi soft and luscious soaked in sugar syrup. To be fair Bengal has its own love affair with ' Chana ' fresh cottage cheese and its other love affair is with sweets. The variety of sweets that you get here amazes everyone.

Makes 8 Jalebis

1 litre full cream milk
1 tbsp to 2 tbsp vinegar diluted with 1 tbsp to 2 tbsp water
3 heaped tbsp all purpose flour
1 tbsp semolina
A tiny pinch of baking soda
2 tbsp sugar
1 tbsp ghee

Oil for deep-frying

For the syrup :-

1.5 cup sugar
3 cups water
A few drops of lemon juice
3 green cardamom

Start by making the cottage cheese aka 'chena' by first bringing the milk to a roaring boil and then adding the diluted vinegar. You shall see the green whey separate from the white cheese. One must immediately turn down the heat and let the cheese form for about 5 minutes and then switch off the gas and cover the pan and leave it for 5 minutes.

Before I added the whey 


Now gather the cheese aka 'chena' in a cheese-cloth or muslin cloth and drain it of the whey by hanging it for about 15 minutes or so. Do not throw away the whey.

Now make your dough with the chena , sugar, all purpose flour, baking soda , ghee, 1 tbsp whey and semolina. Your dough must be extremely soft. Kneading the dough on a wooden surface gives the best result.

Once you are done kneading leave the dough to rest for 15 minutes and in the meanwhile start preparing the sugar syrup by bringing the sugar and water to a boil and adding the cardamom and lemon juice and simmering for 5 minutes.


Now give a good kneading to the dough and divide it into 4 equal halves and then make eight balls from these halves and roll out each ball gently but firmly to form a cylindrical shape. When you are forming the cylinders make sure you dip your hands in the why and then mash the balls and form the cylinders , but do it gently because if you put too much of pressure it will leave cracks and now form a 6 with the dough bring the loose end towards the head and press it gently to form the shape.


 These must not have any cracks and if the dough doesn't have enough liquid it starts cracking which is why you must dip your fingers in the whey.


Now heat enough oil for deep frying but on low heat. Gently slide the final raw chanar jilipi in the oil and fry it till its a golden reddish colour on both the sides and then soak it in the syrup for 2 hours before serving it.

Very Important tips :-


  1. You must use full fat milk else the taste is almost always compromised upon 
  2. When you are making the syrup adding the lemon juice prevents crystallization. 
  3. When making the dough if you happen to add even a bit of extra bicarbonate of soda your jilipis will break when you are frying them which is why after forming the dough and having it let it rest you should first shape and fry and in case it spreads out use a bit of flour , say about 2 tbsp flour and knead the dough. This will prevent the rest of the jilipis from cracking and spreading. 
  4. When you are frying the jilipi it must be on low heat at all times. It will take a frustratingly long time but if you increase the heat it will burn or become golden very quickly and the insides will remain raw.


Thursday, September 18, 2014

Nimki (Bengali Namak Pare)

Nimki (Bengali Namak pare) 


Memories can take you in a trance. It makes you do things that you usually do not do. This is actually the first Durga Puja where I am away from my family. To be fair growing up Durga Puja meant 3 things to me, visiting my maternal grandmother on Shasti which is one of the  auspicious days during the Durga Puja , holidaying somewhere and then eating a lot of sweets on Dashami but when I would get tired of the sweets I would run to the 'Bharar Ghor' which means the store-room , take the container which contained crispy, crunchy salty treats and take a handful and keep munching on them.


As far as I can remember there has not been one single day in our family when 'Nimki' was not present in the house. Nimki is a deep fried crunchy flaky crispy snack which is an utter delight to have with your tea or just like that. Its known as Namak Pare in the Northern parts of India but that variant is slightly different.

To be fair lets talk a bit about the lady who was responsible for the year round presence of Nimki at our home. If I were asked to describe my amma 'paternal grandmother' I would say she is intensely independent in all its true sense, extremely strong willed, confident, progressive, former school teacher , traveler and the lady who cannot live without her 'Nimki's . If she would have had her way she would have carried these crispies everywhere be it Europe or Australia or Africa but sadly for her the immigration at various airports have different ideas.


Anyway what has always marvels me is despite being all those things she has this intense interest in the kitchen.  Age might have slowed her down but she refuses to bow down to age and creates a ruckus in the kitchen but then again we can't take the fire away else the candle will stop burning all together.

To be fair the one thing that my grandmother taught me was to take the best of things without prejudice and even though there is no room for prejudice in this case the recipe I followed is my Mimi's (aunt's who never gets one single dish imperfect) and with her tips anyone can make perfect Nimkis such is her ability to teach all which I would share with you. She gets her recipes from her mother which was shared a good 40 years ago.

I decided that this was the day I would make Nimkis which led to a phone call where all I could say was 'I am making Nimkis and I remembered you' to which my grandmother said, 'I will make Nimkis for you when you come back' Well this time I will make her those crispy delight.

I dedicate this to everyone and serving this with all those fabulous sweets on Dashami , Navaratri and any special occasion is sure to win your guests over.

Before we begin one should know that controlling  and temperature and having patience are the key ingredients to this recipe

So here is a recipe which makes enough Nimki for 5 to 6 people

2.5 cups all purpose flour
Pinch of baking soda
Salt as per taste (I needed 1.5 tsp)
Fat pinch of Oion seeds 'Kala jeera'
6 tbsp vegetable oil for the dough
1 tbsp rice flour (the traditional method)  or cornflour
1/2 cup lukewarm  water
1/2 tsp to 1 tsp chili powder
Juice from 1 lemon

Refined Oil for deep frying

Start by making your dough by dumping the dry ingredients along with the spices and salt in a large bowl and mixing them with your clean hands and then make the hole in the center and add the oil and slowly add the water bit by bit working your dough continuously. At first the dough will be a bit sticky but you must keep working it till it becomes a smooth elastic dough. Leave it covered for 15 minutes and now heat the oil (medium flame )  in a deep bottomed pan. Divide the dough and roll it out and then cut it into diamond shaped patterns and deep fry till golden on both the sides.


You must remember that when you put the diamond shaped dough in the oil it must be on medium heat and after  1 minute turn it down to low and fry it on low. It will take you anywhere between 10 minutes to 15 minutes. You know they are almost done when they feel hard to touch with the spatula .


Now you must increase the temperature to medium for 2 minutes and then take them out with a slotted spoon , drain them and then let them cool down before trying them out.Store them in air-tight containers and enjoy with your cup of tea.


Important tips :-


  1. The lemon juice and baking soda make the nimkis crispy 
  2. Controlling temperature is very very important. If you try frying the nimkis on high heat it will burn them or give it a bitter taste. 
  3. Don't be scared to use as many nimkis in the oil as possible because in the beginning they might seem a bit crowded they soon start frying and separating 
  4. Testing their done-ness is a bit like testing biscuits where you need them to completely cool down 
This is part of Kolkata Food Blogger's Durga Puja Event 


Wednesday, July 30, 2014

Sondesh

Norom paker Sondesh (Ultra soft sondesh)  


Once you have had your success with Sondesh a delicate sweet from Bengal you realize its one of the easiest desserts to make but all you need is patience, strong hands and a will to knead a good amount.

Before I give the very easy recipe what you need to know is Sondesh can be categorized broadly under 'Norom Pak' the soft melt in the mouth variant which is cooked for a few minutes to make cotton soft sweets and then there is the 'Kora Pak' the hard variant which lasts longer than the Norom Pak but quite honestly isn't of the melt in the mouth texture. Then there is 'Kacha Golla' a softer variant which is not even cooked or hardly cooked to keep it ultra soft.


Now I was born in the city of sweets at least the city of Sondesh, Kolkata , but I am very particular about the kind of sondesh I eat. If its coloured I will give it a skip, if it has too much of fragrance from artifical attar I detest it. I like mine in the purest form with natural falvourings such as rose or saffron or pistachios or almonds.

When it comes to Sondesh I cannot remember my maternal grandmother, 'Dima' who stays in a house which is more ancient than her 92 years. Not that she has ever made sweets but my Dima was always the sweet connoisseur or rather one who staunchly believed when it came to sweets it must be traditional. There is one of the oldest sweet shops in Calcutta located near her home called , 'Bhim Chandra Nag' established somewhere in 1848 and while I was growing up she would ritually send me to get sweets from the sweetshop to feed me a huge number of sweets. Later in my late teen years I would protest saying that it seemed irrational since at times I did not want to eat sweets. Only after I passed out from college and suddenly stepped into adulthood did I realize how much I cherish these silly rituals.


Today when I made these soft sondesh and fed my 92 year old grandmother at first she refused them saying she has lost her taste and doesn't enjoy sweets and then when I informed her that I have made it myself she ate an entire square and said that it was fantastic. I guess that brought me all the joy.


Then there is my Mimi (maternal uncle's wife) who is a true magician in the kitchen when it comes to Bengali dishes and when her approval came for the sweets I knew I have passed in the art of making sweets. Funnily enough I realize it now that I have begun writing that I did not follow anyone's recipe but I will share those very important tips which are essential

What you need for 16 squares of Sondesh

1.5 litre full cream milk
1 tbsp to 2 tbsp non fruit vinegar diluted with 1 tbsp water
6 tbsp castor sugar
50gm finely chopped pistachios which have been blanched from before
2 fat green cardamom
Ghee or clarified butter for greasing

The process is pretty simple. Bring the milk to a roaring boil in a large pan and slowly add the diluted vinegar and keep boiling till the cheese is formed and you see the greenish whey and the floating cheese. Turn off the gas stove and cover with a lid with no holes and let it stand for 5 minutes.

Now gather the cheese in a cheesecloth or muslin cloth and hang it to drain it of whey for 15 minutes.

In the meantime dry roast the cardamom for 2 minutes and take out the seeds and pound them to a fine powder. Blanch the pistachios and finely chop them.

After 15 minutes take the cheese in a large flat bowl. It helps to have a raised fence around the flat plate greased with ghee from before for ease of working with the cheese. Start mashing it using both your hands and then use the heel of your palm to make the smoothest dough ever. Your Sondesh's success depends completely on this process of kneading.

After 5 minutes add the sugar and cardamom powder and knead for 15 minutes. In the end it will be a soft dough. Now take the smallest possible wok in proportion to the amount of cheese dough and place the dough in it and cook this on low heat for just about 2 minutes to 3 minutes.


Let it cool down and knead with some amount of the finely chopped pistachios for 10 minutes and then make 16 balls and shape them in squares on a greased plate. Finish off by sprinkling pistachios on each square.


For making Ultra soft Sondesh these following tips are crucial :-


  1. The milk must absolutely be 100% whole milk. No compromise on fat please 
  2. You must not use lemon to curdle the milk since it leaves a lemony smell which interferes with the flavours you use 
  3. If you want ultra soft melt in the mouth Sondesh you hand the cheese for 15 minutes else you can hang it for 30 minutes 
  4. You cannot compromise on the time for kneading because that dictates how soft your Sondesh will turn out 
  5. When it comes to flavouring know that Sondesh is supposed to be delicate so if you are using rose flavour where you use 1 tbsp rose water per 500ml of milk used for making cheese its best to not use cardamom because then the flavour of cardamom will overpower the flavour of rose. When using saffron no other flavouring is needed. 


Rose flavoured Norom Paker Sondesh


Thursday, June 12, 2014

Aloor Dom (bengali Dum Aloo)

Aloor Dom (Bengali Dum Aloo) 


The truth is the same dish is prepared in a number of ways across this vast country called. India. Take the simple Dum Aloo. A dry potato gravy which is served across North India. Now Bengal is in the East of India but when The Nawab of Awadh relocated to our lovely state he brought along with him the delightful cuisine that is Awadhi cuisine and so the influence of North India can be seen in many of the dishes from this Lush green state yet it has its own distinct taste. For one, our dishes are much more subtle . Now to be fair even among families in Bengal there are different recipes followed for a dish . So while my paternal Grandmother puts in curry leaves , my Mimi (the perfect culinary wizardess) from whom I learnt msot of my Bengali dishes keeps it rather traditional using her mother's recipe.

Now Mimi herself is a young 65 year old and this recipe handed down from her mother would definitely make it a heritage one. Taste as we all know is subjective. So for some this might seem too subtle while some would find it delightful. I myself quite obviously love it enough to make it my one and only Bengali Aloor Dom. What gives this its distinct taste is the absence of onions and garlic.

Serves 3 to 4

6 medium sized Potatoes halved

The wet spices

Ginger chili cumin paste (made with 5 green chilies , 1 inch ginger and 1/2 tsp cumin seeds)
5 tbsp Tomato paste (I required 1 large tomato)
1/4th cup whisked curd

The dry spices

Pinch of asafoetida aka hing
1 tsp cumin seeds
2 green cardamom given a light pounding
1 inch cinnamon stick
2 cloves
Salt as per taste
Pinch of turmeric
1 tsp red chili powder
1 cup water (200ml)

1/4th cup mustard oil for frying the potatoes
2 tbsp ghee

For garnishing

2 tbsp finely chopped fresh coriander
2 slit green chilies


Start by making the green chili ginger cumin paste, then make your tomato paste and parboil the potatoes with their skin on. Once cool enough to handle peel them and heat the mustard oil and fry the potatoes on medium heat till they turn a lovely golden colour but do not brown them. Drain them and keep aside. You will be left with the mustard oil which you can use for other dishes. Now heat the ghee and add the asafoetida and then add the cumin seeds and when they splutter immediately add the ginger green chili cumin paste and saute for 2 minutes and add the tomato paste and saute till the oil separates and add the whisked curd and keep stirring on high heat. This constant stirring prevents the curd from splitting. Now add the water and bring to a boil stirring constantly and then simmer on low heat for 5 minutes and add the potatoes and bring to a boil again and then simmer for another 10 minutes to 15 minutes till you get a thick gravy. Now many people like ti completely dry but since we usually pair Aloor Dom with Luchi ( a special fried puffed up flatbread from Bengal)  , it helps to have a bit of gravy to dip the puffed up fried poori in. And then again taste is subjective. So do what would best suit you. Garnish and serve


Enjoy

Wednesday, May 14, 2014

Bhetki Macher Kalia


Bhetki Macher Kalia 

(Fish in a rich gravy from Bengal) 


We Bengalis from Eastern India are known for our love for fish. In fact there was a time when chicken was not allowed in most homes and mutton was also mostly avoided other than the meat cooked from animal sacrifice. Of course all that has changed and in fact Bengal was one of the first few states where one could enjoy a wide variety of cuisines but then again with time the rest of India caught up with its global outlook and some have more to offer than our state at present but a Bengali's love for fish remains unchanged. There are enough number of varieties of fish to confuse me and I personally do not like all the varieties but then again there is one fish which I simply love and that is the famous 'Bhetki' . Its probably the soft texture of the fish or the fact that it is what is mostly used for fries which most people love and is an item which is a definitive inclusion for all special occasions.


We Bengalis have a way of organizing and categorizing everything so we have soupy curries which we call 'Jhol' then the word 'Jhal' which literally translates to hot food can mean different things to different family. To my family any 'Jhal' will most obviously have mustard to provide the heat and then there is Kalia . I am not sure what it exactly means but all I know is it is a rich curry which is mostly served on special occasions. I recently read that it is called so because of the use of onions but since the source is not completely credible I wouldn't go by it.


Most homes have their own version of Kalia with addition and substraction of a few ingredients and as usual for traditional Bengali dishes I have looked upto my Mimi who has taught me the tricks of Bengali cuisine. Before I move on to the recipe I have to say a few words about my beloved aunt (Mother's Brother's wife). I have not seen any other lady who always produces perfect dishes from her kitchen. Her luchis are always perfectly puffed up (Puffed up flatbread) Her dishes always have the perfect balance between spices and saltiness and sweetness and if you follow her recipe then its a cakewalk because we all learn from experience as to what we must do and not do when preparing something but with Mimi she tells you beforehand what problems you might face. So she warns you that the fish might break for frying and you have to handle it gently or it would splutter oil so that int eh end you end up with a lovely dish and half of the credit goes to her. Here is a recipe which had been handed to her by her mother and since she has handed to me I might as well this recipe a heritage one.

Serves 4 to 5

Around 1 kilogram and 100gm Bhetki fish sliced into 8 pieces
1 heaped tbsp smooth ginger paste in which 2 green chilies has been added before making the paste
1 heaped tbsp smooth garlic paste
5 tbsp smooth onion paste
6 tbsp tomato paste
2 green cardamom
Cinnamon around the size of half a thumb
4 cloves
2 large bay leaves
Mustard oil to fry the fish
4 tbsp ghee
Salt as per taste
1 tsp chili powder
Turmeric for rubbing on the fish and a pinch to be used for the gravy
650ml of water
1 green chili for garnishing

Start by rubbing salt , turmeric and 1 tbsp mustard oil on the fish and marinating in it for about 1 hour. Now heat the oil and fry the fish but do not brown it. Since it will be used in the gravy one should ideally fry it lightly so that it reaches a nice golden colour and transfer to a big container.


Now decant the extra mustard oil and heat 3 tbsp ghee and add the ginger paste and garlic paste and sautee till the raw smell goes away and add the onion paste and then wait till the raw smell of onions go away and you find the oil separating and then add the tomato and crushed bay leaf and sautee till the oil separates out . Now crush the whole spices but do not grind them and add them and then bring the wet spice which is being cooked to a boil and add the chili powder, turmeric and salt and then simmer and add the water and bring to boil and then lower heat and add the fish one by one but very carefully and simmer covered for the next 15 minutes or so. You shall see a film of fat from the ghee and then switch off the gas stove and transfer it to a bowl. When transferring remember that the fish is soft so try and gently place them one by one and then use a bit of gravy and place a few more fish and top with more gravy. Use 1 slit green chili for garnishing and serve with plain steamed rice .


Tips


  1. The fish is very soft and so there is a chance that it might easily break so  when turning it while frying handle it very gently. 
  2. Do not brown the fish else the gravy would not penetrate through . ideally the fish should have a golden hue when you should take it out of the wok and transfer it to a dish.