Tuesday, September 30, 2014

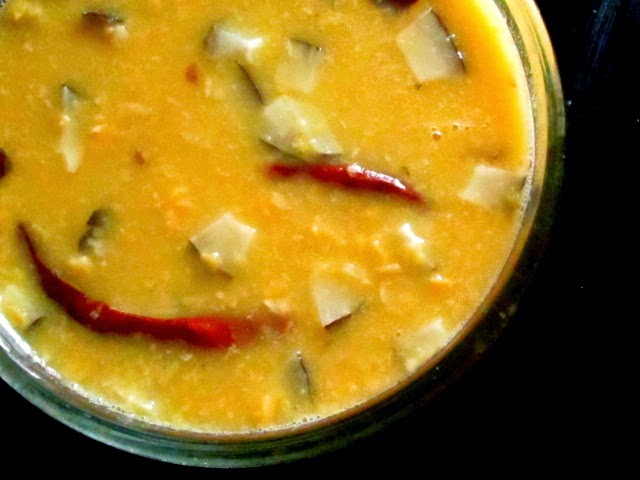
Cholar Dal (Bengali Chana Pulse)

Cholar Dal (Bengali Chana Pulse)


There is little to be said about this Classic Bengali Pulse. Bengalis  cook this  for all special occasions be it the Pujas, weddings, rice eating ceremony, gathering of friends and family or just for a special Bengali meal. You can team it up with all purpose flour pooris which Bengalis call 'luchi' or hot steaming rice and julienne potato which is deep fried .


The bottom line is that, this is a classic dish. Now its mostly the same recipe followed everywhere with a few variations. Here is one that I know of passed down by my Mimi (aunt) whose mother had passed it down a long time ago.

Serves 4 to 5

1 cup Chana pulse 'cholar dal'
1 tbsp clarified butter 'ghee'
2 green cardamom
1 tsp finely chopped ginger
2 to 3 dried red chili
Half a cup diced fresh coconut
A handful of raisins
Salt as per taste
Pinch of turmeric
Sugar as per taste (Now, traditionally  this pulse is supposed to be a bit on the sweeter side so I would personally use 1 tbsp to 1.5 tbsp sugar but you can adjust as per your taste)
4 cups of water
1 large bay leaf

Soak the pulse for 1 hour and then pressure cook it on low flame till 1 whistle to 2 whistles and let the steam go out on its own. It should have cooked by that time.

Now heat the ghee and add the ginger and saute and then add the cardamom , bay leaf and red chilies and keep sauteing and then add the coconut and raisins and finally the pulse. If it seems too thick add 1 cup of water and bring to a boil and add salt, turmeric and sugar and simmer for 10 minutes. It should be of a medium thickness and the pulse must retain their shape. Its traditionally supposed to be a thick pulse but not as thick as the North Indian Mah ki Dal aka Dal makhani


Creamy Potato Spinach 'Aloo palak malaiwale'

Creamy Potato Spinach 'Aloo palak malaiwale' 


There here are some dishes which you anyway know are going to be delicious because butter and cream makes everything extra delicious. Now normally I don't even bring in fresh cream in my house because the thought of those extra kilograms hanging from everywhere on my body  is not something I relish thinking about but then there are those special occasions when you can actually indulge and my mother-in-law's visit is reason enough to make a creamy lip-smacking Aloo Palak Malaiawale aka Creamy Potato Spinach.


Now before I share the this recipe let me tell my readers from before that any substitution of the ghee or cream used here will not render the same results at all. In case you want to not use ghee the only other substitute for ghee can be mustard oil but even that cannot give it that delicious taste that ghee gives .

Anyway moving on to the recipe

Serves 3 to 4

4 medium sized potatoes cubed into medium size
1 large bunch of spinach
1.5 tbsp minced garlic
1 inch ginger chopped julienne
1 green chili julienne
Salt as per taste
4 cups of water
4 heaped tbsp fresh cream
2 heaped tsp clarified butter 'ghee'
Pinch of asafoetida 'hing'
Garam masala made with 1/2 black cardamom, 1 green cardamom, 1 tsp cumin seeds, 2 tsp coriander seeds, 1 blade of mace, pinch of nutmeg, 1 bay leaf , 1/2 inch cinnamon, 3 cloves
3 to 4 green chilies
Dollop of butter

Start by dry roasting the ingredients for your 'Garam Masala' and then grinding it to a fine powdery consistency.

Now ever since I read this Italian chef's tips on maintaining the green colour of spinach I have never had  trouble with maintaining its colour. Its simple actually. Wash the spinach well. The easiest way to make sure you get rid of all the dirt is to fill a bit pan with water and then chopping off the end of the spinach and soaking the leaves in the water and rubbing them and cleaning them. This mostly gets out all the dirt.             Bring the 4 cups of water to a boil. Now add the chopped spinach leaves and let it boil for exactly 2 minutes and immediately take out the spinach and there you have boiled green spinach. Reserve the water in which you have cooked the spinach.

Cube the potatoes and heat the ghee and add the asafoetida 'hing' and when it splutters add the minced garlic, ginger and chili  and saute till softened and add the potatoes and cook on medium heat to saute the potatoes and add the reserved spinach water and bring to a boil and add salt and then simmer covered till the potatoes are mostly cooked. It might take anything between 10 minutes to 15 minutes.

In the meantime make a paste of the cooked spinach and 3 green chilies.


Now add half the garam masala and remove the cover and cook till the curry dries up. Add the spinach paste and mix well and then add the cream and mix well and simmer for 2 minutes . taste and add salt if required. Serve with a dollop of butter on top with soft chapatis or hot fluffy rice.


Sunday, September 28, 2014

Paneer Butter Masala

Paneer Butter Masala 


I usually like trying out different versions of the same dish so that I might eventually find a recipe which suits my taste buds perfectly. Such was the case with Paneer Butter Masala also known as Paneer Makhani. Lets face it the name itself suggests it must have copious amount of butter but then the recipes I have had till date did have butter and a lot of ingredients yet there was something which was missing.


Now Butter and I go long back. My Dima 'maternal grandmother' would always compliment the Punjabis due to their use of butter in most dishes. All throughout my growing up years I was fed a meal of hot steaming rice with a good 50gm of butter and numerous boiled and mashed vegetables. Lucky for me my parents had got me admitted to swimming and till I  was involved in some pretty heavy exercise which kept my weight in check. Anyway coming back to the dish, now I know that everyone wants to be healthy and that's great. In fact on any regular day you'l find me with a bowl of steamed vegetables or a raw salad and some boiled egg or poached chicken but when it comes to certain dishes you cannot just try and make them healthy. It takes away the entire essence of the dish. Exercising and balancing your diet on every other day is how you stay healthy not by trying to make a dish named Butter Masala healthy.


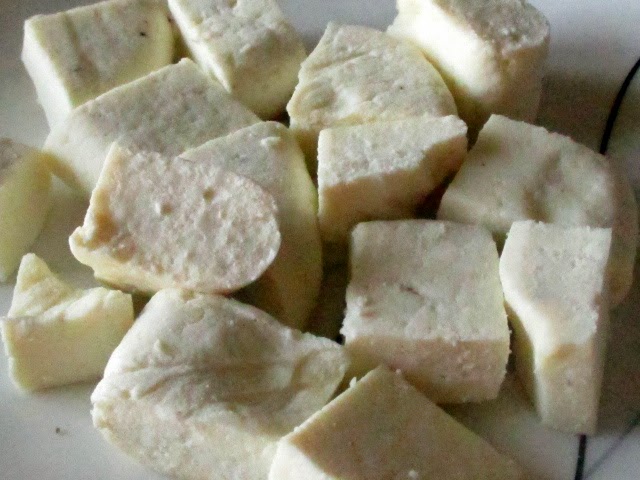
Anyway back to the recipe. I had discovered the lovely robust chef Harpal Singh's videos quite by chance and after my tremendous success with his Kadhi I naturally knew whom to turn to for the Paneer Butter Masala. So here goes the recipe. I did use homemade paneer and believe me when I say that once you have made homemade paneer there is no looking back. You can use store bought paneer if you are not much inclined to making your own paneer .

Chef Harpal Singh Sokhi's Paneer Butter Masala

Serves 3

For the paneer :-

1.5 litre full cream milk
1.5 tbsp vinegar diluted with 2 tbsp water or 2 cups leftover whey

For the tomato gravy

6 medium sized tomatoes roughly chopped
6 green cardamom
3 blades of mace
100gm butter
1 tbsp minced garlic
1/2 cup fresh cream (I used Amul Cream but do use double cream if you have access to it )
Salt as per taste
1/2 tbsp sugar
1/2 tsp Kashmiri chili powder

For the final gravy

Ginger the size of half your little finger cut into julienne
2 green chilies de-seeded and cut julienne
1/2 tbsp butter
The freshly made tomato gravy


The final paneer made at home 
Start by making the paneer. Simply bring the milk to a roaring boil and then add the diluted vinegar or whey and lower the temperature and let the milk for the cheese and when you see the green coloured whey with the cheese floating around switch off the stove and cover and keep for 5 minutes . Strain the cheese but reserve the whey and tie the cheese in a cheesecloth or muslin cloth and drain it for 15 minutes to 20 minutes and then flatten it out with the cloth and put in on a plate and put another plate on top with a mortar and pestle or a heavy book on the plate and leave for 1 hour or so. Cut the slab into cubes and there you go , you have soft fresh paneer.

Store the whey in the refrigerator for future use. If you knead your dough for chapatis with whey the chapatis turn out extra soft, used in vegetable curries it enhances the flavour and if used for the next batch of paneer you will get the softest paneer ever.

Final tomato gravy 

Now start off with your tomato gravy. Melt 1 tbsp butter and add the chopped tomatoes and cook over medium to low flame till its mushy (covering and cooking gives faster results) and add the mace and cardamom and cook till it forms a paste and add the Kashmiri chili powder , add salt and cook for another minute . Let it cool down and blend it smooth .

Now mince the garlic. Melt 1 tbsp butter and saute the garlic and add the tomato paste and cook of medium flame , stirring continuously for 3 minutes and add 75gm butter and mix well and cook for 1 minute and add half a cup of cream and cook on low flame for another 2 minutes and your tomato base is ready.

Now melt 1 tbsp butter and saute ginger chopped julienne and the green chilies and add the paneer cubes and saute well. When the paneer turns golden add the tomato gravy and mix well and simmer for 3 minutes and serve with hot chapati or butter nan or Basmati rice.


Thursday, September 25, 2014

Simple Chicken Curry

Simple Chicken Curry 


I firmly believe there are certain places, books, pages of books, musical pieces which remind you of a particular person and when it comes to certain dishes it not only reminds you but it makes you want to be near the person.

This recipe is one of the simplest recipes that there ever can be and it sure does make me miss someone. This is for the one who loves his ghee , understands the importance of marination, can cook effortlessly without consulting any cook books yet his greatest teaching for me would be independence which is why I have followed my Baba (father's) recipe and have merged it with my own ideas. He is the one who unconsciously inspired me to become passionate about peeling, chopping, shredding, sauteing etc

The one thing I have to say is that this dish should either be prepared in mustard oil or in ghee otherwise the flavour doesn't come out that well.


Serves 2 to 3

450 gm chicken (legs and thigh)
1 tbsp smooth garlic paste
1/2 tsp whole black pepper
Paste made from 4 dried red chili and 1 tsp roughly chopped ginger and 1 tbsp vinegar


1 medium sized onion
1 medium sized tomato
1/2 cup whisked yogurt
1/4th cup water
Salt as per taste

2 green cardamom
1 black cardamom
Cinnamon (3/4th of your little finger)
2 blades of mace
2 cloves

1.5 tsp ghee / mustard oil

1 tbsp freshly minced coriander leaves for garnishing


Make a smooth paste of the black pepper, ginger, dried red chili and vinegar and then mix it with the garlic paste and marinate your chicken for about an hour. Meanwhile give a light pounding to the dry spices (green cardamom, black cardamom, cinnamon . mace and clove)

Now heat the ghee or mustard oil and add the chicken and seal its juices by cooking it on high flame for 2 minutes and then add the onion paste and tomato paste and keep stirring it well coating the chicken and then cover and cook on medium flame for a minute and add salt and the spices which you have pounded. Mix well and add the whisked curd and then add the water and bring to a boil stirring continuously (else the yogurt will split) and simmer covered for 5 minutes till the curry seems thick and coats the chicken . Garnish with coriander leaves and enjoy this hot ,fiery and lip-smacking dish with hot steaming rice or soft hot fluffy chapatis .

Tips


  1. The breast and things and legs of a chicken need a different time for cooking which is why we often end up cooking an entire chicken and some pieces of the curry come out soft and succulent while some other pieces come out a bit stringy which is why only thighs and legs have been used. You can reserve the breast for later usage. 
  2. Before you add the water to the curry add it to the bowl in which you have marinated the chicken and give it a good stir then add this water from the bowl to the bowl in which you have whisked the yogurt stir and then add to the pot. This way you do not waste any flavours. 
  3. Always make sure that you whisk your curd before adding it to the pot else it will curdle. 


Monday, September 22, 2014

Chanar Jilipi (Cottage Cheese Jalebi)

Chanar Jilipi (Cottage Cheese Jalebi) 


 There comes a time of the year when the entire state of Bengal gets intoxicated with celebrating the Goddess Durga.


Now the whole of India loves jalebis , fermented deep fried soaked in syrup ,its crunchy and sweet and delicious but then it is only in Bengal that we have Chanar Jilipi soft and luscious soaked in sugar syrup. To be fair Bengal has its own love affair with ' Chana ' fresh cottage cheese and its other love affair is with sweets. The variety of sweets that you get here amazes everyone.

Makes 8 Jalebis

1 litre full cream milk
1 tbsp to 2 tbsp vinegar diluted with 1 tbsp to 2 tbsp water
3 heaped tbsp all purpose flour
1 tbsp semolina
A tiny pinch of baking soda
2 tbsp sugar
1 tbsp ghee

Oil for deep-frying

For the syrup :-

1.5 cup sugar
3 cups water
A few drops of lemon juice
3 green cardamom

Start by making the cottage cheese aka 'chena' by first bringing the milk to a roaring boil and then adding the diluted vinegar. You shall see the green whey separate from the white cheese. One must immediately turn down the heat and let the cheese form for about 5 minutes and then switch off the gas and cover the pan and leave it for 5 minutes.

Before I added the whey 


Now gather the cheese aka 'chena' in a cheese-cloth or muslin cloth and drain it of the whey by hanging it for about 15 minutes or so. Do not throw away the whey.

Now make your dough with the chena , sugar, all purpose flour, baking soda , ghee, 1 tbsp whey and semolina. Your dough must be extremely soft. Kneading the dough on a wooden surface gives the best result.

Once you are done kneading leave the dough to rest for 15 minutes and in the meanwhile start preparing the sugar syrup by bringing the sugar and water to a boil and adding the cardamom and lemon juice and simmering for 5 minutes.


Now give a good kneading to the dough and divide it into 4 equal halves and then make eight balls from these halves and roll out each ball gently but firmly to form a cylindrical shape. When you are forming the cylinders make sure you dip your hands in the why and then mash the balls and form the cylinders , but do it gently because if you put too much of pressure it will leave cracks and now form a 6 with the dough bring the loose end towards the head and press it gently to form the shape.


 These must not have any cracks and if the dough doesn't have enough liquid it starts cracking which is why you must dip your fingers in the whey.


Now heat enough oil for deep frying but on low heat. Gently slide the final raw chanar jilipi in the oil and fry it till its a golden reddish colour on both the sides and then soak it in the syrup for 2 hours before serving it.

Very Important tips :-


  1. You must use full fat milk else the taste is almost always compromised upon 
  2. When you are making the syrup adding the lemon juice prevents crystallization. 
  3. When making the dough if you happen to add even a bit of extra bicarbonate of soda your jilipis will break when you are frying them which is why after forming the dough and having it let it rest you should first shape and fry and in case it spreads out use a bit of flour , say about 2 tbsp flour and knead the dough. This will prevent the rest of the jilipis from cracking and spreading. 
  4. When you are frying the jilipi it must be on low heat at all times. It will take a frustratingly long time but if you increase the heat it will burn or become golden very quickly and the insides will remain raw.


Thursday, September 18, 2014

Nimki (Bengali Namak Pare)

Nimki (Bengali Namak pare) 


Memories can take you in a trance. It makes you do things that you usually do not do. This is actually the first Durga Puja where I am away from my family. To be fair growing up Durga Puja meant 3 things to me, visiting my maternal grandmother on Shasti which is one of the  auspicious days during the Durga Puja , holidaying somewhere and then eating a lot of sweets on Dashami but when I would get tired of the sweets I would run to the 'Bharar Ghor' which means the store-room , take the container which contained crispy, crunchy salty treats and take a handful and keep munching on them.


As far as I can remember there has not been one single day in our family when 'Nimki' was not present in the house. Nimki is a deep fried crunchy flaky crispy snack which is an utter delight to have with your tea or just like that. Its known as Namak Pare in the Northern parts of India but that variant is slightly different.

To be fair lets talk a bit about the lady who was responsible for the year round presence of Nimki at our home. If I were asked to describe my amma 'paternal grandmother' I would say she is intensely independent in all its true sense, extremely strong willed, confident, progressive, former school teacher , traveler and the lady who cannot live without her 'Nimki's . If she would have had her way she would have carried these crispies everywhere be it Europe or Australia or Africa but sadly for her the immigration at various airports have different ideas.


Anyway what has always marvels me is despite being all those things she has this intense interest in the kitchen.  Age might have slowed her down but she refuses to bow down to age and creates a ruckus in the kitchen but then again we can't take the fire away else the candle will stop burning all together.

To be fair the one thing that my grandmother taught me was to take the best of things without prejudice and even though there is no room for prejudice in this case the recipe I followed is my Mimi's (aunt's who never gets one single dish imperfect) and with her tips anyone can make perfect Nimkis such is her ability to teach all which I would share with you. She gets her recipes from her mother which was shared a good 40 years ago.

I decided that this was the day I would make Nimkis which led to a phone call where all I could say was 'I am making Nimkis and I remembered you' to which my grandmother said, 'I will make Nimkis for you when you come back' Well this time I will make her those crispy delight.

I dedicate this to everyone and serving this with all those fabulous sweets on Dashami , Navaratri and any special occasion is sure to win your guests over.

Before we begin one should know that controlling  and temperature and having patience are the key ingredients to this recipe

So here is a recipe which makes enough Nimki for 5 to 6 people

2.5 cups all purpose flour
Pinch of baking soda
Salt as per taste (I needed 1.5 tsp)
Fat pinch of Oion seeds 'Kala jeera'
6 tbsp vegetable oil for the dough
1 tbsp rice flour (the traditional method)  or cornflour
1/2 cup lukewarm  water
1/2 tsp to 1 tsp chili powder
Juice from 1 lemon

Refined Oil for deep frying

Start by making your dough by dumping the dry ingredients along with the spices and salt in a large bowl and mixing them with your clean hands and then make the hole in the center and add the oil and slowly add the water bit by bit working your dough continuously. At first the dough will be a bit sticky but you must keep working it till it becomes a smooth elastic dough. Leave it covered for 15 minutes and now heat the oil (medium flame )  in a deep bottomed pan. Divide the dough and roll it out and then cut it into diamond shaped patterns and deep fry till golden on both the sides.


You must remember that when you put the diamond shaped dough in the oil it must be on medium heat and after  1 minute turn it down to low and fry it on low. It will take you anywhere between 10 minutes to 15 minutes. You know they are almost done when they feel hard to touch with the spatula .


Now you must increase the temperature to medium for 2 minutes and then take them out with a slotted spoon , drain them and then let them cool down before trying them out.Store them in air-tight containers and enjoy with your cup of tea.


Important tips :-


  1. The lemon juice and baking soda make the nimkis crispy 
  2. Controlling temperature is very very important. If you try frying the nimkis on high heat it will burn them or give it a bitter taste. 
  3. Don't be scared to use as many nimkis in the oil as possible because in the beginning they might seem a bit crowded they soon start frying and separating 
  4. Testing their done-ness is a bit like testing biscuits where you need them to completely cool down 
This is part of Kolkata Food Blogger's Durga Puja Event 


Wednesday, September 17, 2014

Fish in Lemon Sauce

Fish in Lemon Sauce


I personally believe that the success of a dish depends 85% on its taste , 5% on presentation and 10% on the emotions attached to it. While dishes do have the power to transform a bad day into a better one I a dish with the special addition of memories makes the experience of having the dish even better.

Lets be clear on one fact though, a dish cannot simply succeed on the emotions attached to it. The base should be its taste.


I funnily come from a strange family where praises are hardly ever given or received other than those rare occasions  . To be fair most daughters will claim that their mothers are the best cooks in the world. I make no such claim. I grew up with a radically independent mother who was good at organizing trips had immense pride not to be confused with arrogance and was honest and tough. She would consciously avoid the kitchen just because she felt like it and then there would be those rare occasions when she would cook which I mostly did not take an interest in because when I was young I had a problem with most dishes until the age of 15 years.


My mother might not have cooked but she gave me some of the most memorable times which usually remains buried and sometimes come out with a force which you cannot look away from be it those Saturdays when she would bring home those sandwiches for the mother and the daughter or the trips to the Museums but then the memories which I love looking at are of our tiny family of three going out for Chinese cuisine once every week. Calcutta can boast of a long and strong association with Chinese cuisine courtesy of the Chinese population who made Calcutta their home centuries ago . As a result you get some of the best Chinese dishes in Calcutta.

Hau Hua was one such Chinese eatery which we loved. Soon I was deeply involved with swimming which sadly put a stop to our beautiful family outings. It was around this time when I was about 11 years or so that my mother suddenly started making Chinese dishes just a few but what I remember was how astonished I was with those dishes. You see while most of the girls at school would bring these lovely lunch boxes prepared lovingly by their mothers I used to carry the same old boring lunch box of bread and butter with some fruit which was sometimes changed for a cake or so. I was honestly jealous of the girls who would brag about how well their mothers cook be it the sandwiches or fried rice and then my mother did something which made me realize that I had a gem of a cook at home.


There she was the one who never entered the kitchen whipping up exact replicas of Hau Hua's dishes. She mostly stuck to 3 dishes but boy were they amazing, neither oily nor with the overpowering taste of garlic and ginger it was just perfect and my mother was definitely not modest about the dishes. Sure she take hours to prepare a dish but when she did they came out perfect.

Much later in life I realized why my mother could make such amazing dishes despite not entering the kitchen too often. Cooking those dishes was not an obligation for her. Of course everyone cooks out of love but her greatest strength was  her desire for perfection without the burden of obligation. She was free , more free than a bird.

She could take hours chopping the carrots as thinly as possible without any hurry or worry. This merry time lasted a short while till I became a difficult teenager and then I developed this intense passion for cooking which I cannot say I got from my mother but then the woman did make some of the best Chinese dishes that there ever can be. So here I am sharing one of her recipes which I altered just a bit and it all comes from memories because my mother never wrote it down and when I recently asked her to make it she said she has forgotten which is a complete lie since her memory is like an elephant's but I guess those times of abandoning  homework on the sly (she would be furious if I abandoned homework) to take a sneak peak at how she makes it  is finally paying off.


She would usually use chicken but I used basa to make Fish in lemon sauce because we Bengalis love our fish and Chinese food and with the famous Durga Puja round the corner this is part of Kolkata Food Blogger's Puja event Durga Puja Bhuri Bhoj 

Here is the recipe which serves 2 :-

200gm to 250gm of Basa or any other boneless fillet
2 tsp garlic paste
1 tsp ginger paste
2 tbsp scallion (the leaves alone)
2 tbsp cornflour
Salt as per taste
2 bird eye chili (My mother would not use this but I found it to increase the flavour)
2 tbsp lemon juice
3/4th cup water

2 tbsp oil

Simply make a course paste of the ginger and garlic and then marinate the fish for 1 hour with salt, 1 tbsp lemon juice and the juice from the ginger garlic paste and reserve the rest of the paste for the sauce .

Now coat the fish with 1.5 tbsp cornflour and shallow fry in  2 tbsp oil till its golden on both sides and in the same pan add the ginger-garlic paste and saute for a while taking care not to burn it. Add half the chopped scallion and saute and add 1/2 cup water. Now take 1 tsp cornflour in the bowl in which you have marinated the fish and 1/4th cup water bit by bit to make sure that the cornflour dissolves without leaving any lump and add a bit of salt and add this to the pan and bring to a boil and check the level of salt and add more if required and then add the fish and chopped bird eye chili and simmer for 5 minutes and add the remaining  lemon juice and simmer for another 3 minutes to 5 minutes  .


Serve with plain white rice

Tips :-

Lemon juice should only be added right at the end of simmering else it might make the sauce bitter.


Batter Fried Fish (Bengali style)

Batter Fried Fish (Bengali style) 


This post is special for a number of reasons. You see sometimes you need a bit of push to do what you love the most. So here is the deal. With Kolkata Food Blogger's 'Durga Puja Bhuri Bhoj  I got  the right kind of inspiration to make this dish. 

The point is that,  you may take the girl away from Calcutta but you can't take the fish away from her. Yes my dear readers I am in a fish heaven. I was initially apprehensive about Bombay aka Mumbai because it was unfamiliar territory for me but once I discovered the local supermarket which might not have the fish that I am familiar with in Calcutta but has a world of delightful fish, there is fresh Sardine and Mackerel and fresh Tuna. Oh I was excited and delighted.


Now the point is these fish gives you the opportunity to make wonderful healthy meals especially suitable for salads, pasta etc . Back home most of the fish we eat is fresh water fish and has tiny bones all over them and it is a delight for Bengalis to eat those fish and take out the bones while eating but they don't give too much of opportunity to be cooked in any other form than the traditional Bengali recipes which has its own charm but then no other fish can take the place of the sweet 'Bhetki' a large fish with a single bone which is mostly used for fillets and it is this same fish which is used for the famous Bengali fish fry (breadcrumb coated deep fried fillets ) or the batter fried fish served on special occasions.

With the famous festival round the corner I was thinking how lovely it would have been to indulge in some batter fried fish but all I had in the house was basa fish which has its own delight but then for me batter fried fish instantly meant the Bhetki fish. While I was preparing myself to indulge in some nostalgia I realized there are a million other Bengalis who are away from home craving batter fried fish. While the taste of bhetki cannot be imitated I have heard about Tialpia being its replacement but to be fair neither did the fish market have tilapia this particular day nor was bhetki available and so I used basa .

So this recipe I dedicate to all those people who have had to make a home away from home.


Wait there is more. I have a creamy lemony homemade dip for the batter fried fish as well.

Before I share a recipe I must tell you about my friend Pritha , a lady with amazing culinary enthusiasm. Check out her delightful recipe for Bengali Fish Croquets (Macher Chop) another delightful Bengali indulgence to be taken with a cup of tea or just like that

Serves 2

For the Batter fried fish

Marination :-

200gm Boneless fillet (While its ideal to use Bhetki you can use any boneless fish fillet)
2 tsp smooth garlic paste
1.5 tsp smooth ginger paste
Half a medium sized onion
2 green chilies
Salt as per taste
2 tsp oil

For the batter :-

3 tbsp all purpose flour
1.5 tbsp gram flour
1 tbsp rice flour
1/2 cup water
1 tbsp hot oil
Pinch of salt

Oil for frying

For the dip

300gm curd which is drained of water by hanging it in a muslin cloth or cheesecloth
3 large cloves of garlic
Juice from half a lemon
Salt as per taste
1/3rd cup Extra Virgin Olive oil
1 tbsp chives

First make your hand curd and while the water from the curd is being drained marinate your fish by making a smooth paste with the garlic paste, ginger paste, onion and green chilies and the oil. Leave it for half an hour. Now you'l see some of the marinate sticking to the bottom of the bowl.

In the meantime make the dip and chill it. Simply blend the garlic with salt , extra virgin olive oil and lemon juice and then whisk in the hung curd and the smooth blend of garlic oil and lemon juice , add finely chopped chives and chill it.

Don't worry simply transfer the marinated  fish to another bowl and 1/4th  cup of water in the same bowl in which you have marinated the fish and mix well. Preserve this water

Now take a large bowl , one where you can easily dip the fish and make the batter by mixing the dry ingredients (Flour , gram flour and rice flour) and then slowly add the water from the bowl in which the fish was marinated to make a smooth batter. Add a pinch of salt and and 1/4th cup water .

Now here is a trick for crispy batter fried fish. Heat the oil for frying and use 1 tbsp of the hot oil in the batter and whisk well. There is also the two time fry method.

Now dip the fish in the batter and deep fry it on low heat for about 2 minutes on either side and keep aside. Just before serving fry the already fried fish on medium heat for about 30 seconds on each side and you'l be delighted with the crispiness. Serve with the dip and enjoy.

Important tips :-


  1. You must always fry the batter fried fish in low heat else it will quickly burn on the outside leaving the insides uncooked. 
  2. Rice flour added to the batter lends its crispiness. I have used the old fashioned method but in modern times people use cornflour with a pinch of baking soda as well. 
  3. The two time fry method helps make the fish extremely crispy. 
This is part of 


Saturday, September 13, 2014

Tofu Patty

Tofu Patty 


For those of us who eat eggs breakfast can always be made fast and simple and healthy but then what about those who don't eat eggs? A well there are many an Indian option but most of them are time consuming to make and need a lot of pre-planning.

I came up with the idea for a Tofu patty on a day when I had precious little time on my hands. Usually I try and look up a recipe over the internet for a base but this time I really had no time to do that either. What came to my rescue was Tofu which had been soaked and in water and stored in the refrigerator and an age old Bengali method of making cottage cheese balls. I altered the recipe but followed the method of making the balls and flattened them to make patty.


So here goes the recipe :-

Serves 2

200gm Firm Tofu which has been soaked in water and kept in the refrigerator
1 tbsp finely chopped parsley
Salt as per taste
Freshly ground pepper about 1/2 tsp to 1 tsp
3 tbsp to 4 tbsp cornflour
1 tsp finely minced garlic
2 tsp olive oil

Oil for frying

First drain the tofu and crumble it as finely as you can with clean hands and then add the rest of the ingredients except the cornflour and mix very well and try and make a dough. Slowly add the cornflour and mix it well. Now try and make little balls out of the dough, you will find it crumbling a bit but that's alright just keep pressing to make a patty.

Heat oil on medium heat and gently place the patty. Let it cook on medium to low heat for 2 minutes and flip it over and cook for 2 more minutes. Make sure you do not burn the patty.

Enjoy your breakfast by placing the patty inside wholewheat buns slathered with a hung curd dip for a healthy breakfast. Alternately you can slather butter or mayonnaise and make it an indulgence


Tuesday, September 9, 2014

Potato Cutlets

Potato Cutlets 


To be fair these Potato cutlets which I made on a particularly lazy Sunday without the internet in-between back to back episodes of Til' Death was mainly for the husband. My husband loves eating in which should be a boon for a cooking enthusiast such as myself but then at times his want to eat at home bites me hard. It was one of those days when I knew was going to be those overly lazy ones so I decided instead of going out for Dosas I would be prepared with ingredients for a quick snack.

In Bengal the easiest snack that I was served as a child was puffed up rice with the beautifully aromatic green mango and chili flavoured mustard oil and lots of fried potatoes. Now as much as I love fried food I am trying to avoid it these days and so I decided for the husband who suddenly becomes a fry obsessed maniac on holidays I would boil potatoes and make something.

I was about to make the Indian potato cutlets 'Aloo Tikki's which is one of my favourite Indian snacks but then I simply cannot imagine Tikkis without the fiery Green chutney hara bhara chutney and sonth ki chutney (a sweet and tangy sauce) and because I was feeling lazy I ditched the idea of Indian potato cutlets and simply made potato cutlets

Serves 2 (In our case my husband gobbled up 1.5 serving :) )

Here is what you need :-

2 big potatoes
Half a large onion finely chopped
2 large cloves of garlic finely chopped
Salt as per taste
1.5 tsp Fresh Thyme leaves
1 tsp Freshly ground pepper
1 tbsp cornflour

Olive oil for shallow frying

Simply mash everything except the oil together and make 4 cutlets and let them rest in the refrigerator for 15 minutes. This helps them harden up a bit and hold shape when frying.

Heat oil and shallow fry on low heat till its golden brown on both sides. Enjoy by itself or team it up with some mustard.


Tuesday, September 2, 2014

Pan Seared Tilapia

Pan Seared Tilapia


I love light lunches which are colourful but in a natural way. Well it means no artificial colours are used because nature herself provides us with a riot of colours. What more I like Fresh ingredients. 


So while I love Bhetki, a river fish found in Bengal when in Mumbai I would rather use the fresh Tilapia. Well so this is a light yet filling lunch. I believe the terms light and filling are both subjective so if this seems less filling for you do add some boiled potatoes with it. 


Serves 1

200gm Tilapia (1 whole fish)
2 asparagus
2 medium sized tomatoes
1 onion
1 tsp Olive oil
1/4th tsp cayenne pepper
Salt as per taste
1/2 tsp fresh thyme
Splash of white wine vinegar

Ask your fisherman to make fillets of the 200gm fish but make sure you carry back the head and bone for a nice stock for later use. Now marinate the fillets with salt, cayenne pepper and thyme for 30 minutes. In the meantime chop the asparagus and halve the onion and tomatoes.

Heat the oil and coat your non stick pan and add the fish and cook on medium heat for a  minutes and turn over and add the vegetables and cover and lower heat. Your fish will be done in another 30 seconds to 50 seconds. Take them out and add salt to the vegetables with the vinegar and toss about and serve.


Its that simple